Blog By Alexander

0%

CG In Practice

Alexander Ezharjan


Introduction

This reference book is mainly to discuss the detailed knowledge of basic computer graphics based on the soft renderer project called Render Engine, which is a tiny graphical rendering engine developed via pure C++ without any third-party-libraries included.


The content of this book is separated into many parts so that we are able to to have a deeper view into each section.

The first section is this Introduction it self.

The second section is to discuss the mathematical basis for computer graphics. The advanced part as well as those part that have tight relation with the physics is not included, as we are just learning the basic knowledge of computer graphics, not the advanced ones.

The third section is to discuss the inside of render pipeline, which is a significant aspect in the study of computer graphics.

The forth section is to discuss the basic unit used in render engine — Vertex. A vertex stores lots of information including position, tex-coord, normal etc,.


In order to relate the CG knowledge into the application, we have to apply the theory into reality by programing, With this notes, however, the co-related project demands the basics for C++ programming. But if you take a look at the project code, you will notice that the application of the programming language is really in basic way, as too many properties of C++ is not utilized at all. Only some of the basic data structures and methods of the STL is used to make the code more accessible as well as to facilitate the project. Note that any other programing languages are OK to apply the theory I clarified in this book.


Math Basis

Math is needed as the basic tool for every field of science. As the base of the computer science, I myself also regard it as the base of computer graphics, for many algorithms can not escape from the use of math. I separated it as a single chapter so as to mention its importance as well as to show you the utility of math in computer graphics.

In math, we have vectors, matrices, coordinates and more. These are all used in computer graphics. If you have ever used OpenGL or any other libraries, you’ll notice that the math is actually provided as basic APIs and using them is quite simple. But if you are writing the CPU based renderer like I have done in this project, you ought to know the inner activities that these APIs are conducting. Here I am going to show you some of the APIs that I wrote:

1
2
3
4
5
6
7
8
9
10
11
12
13
14
15
16
17
18
19
20
21
22
23
24
25
26
27
28
29
30
31
32
33
34
35
36
37
38
39
40
41
42
43
44
45
46
47
48
49
50
51
52
53
54
55
56
57
58
59
60
61
62
63
64
65
66
67
68
69
70
71
72
73
74
75
76
77
78
79
80
81
82
83
84
85
86
87
88
89
90
91
92
93
94
95
96
97
98
99
100
101
102
103
104
105
106
107
108
109
110
111
112
113
114
115
116
117
118
119
120
121
122
123
124
125
126
127
128
129
130
131
132
133
134
135
136
137
138
139
140
141
142
143
144
145
146
147
148
149
150
151
152
153
154
155
156
157
158
159
160
161
162
163
164
165
166
   float RadToDegree(const float& rad) {
return (rad * 180.f / MATH_PI);
}

float DegreeToRad(const float& degree) {
return (degree * MATH_PI / 180.f);
}

float LinearInerpolate(const float& x1, const float& x2, const float& t)
{
return x1 + (x2 - x1) * t; // formula of linear interpolation
}


float Lerp(const float a, const float b, const float t)
{
if (t <= 0.f)
{
return a;
}
else if (t >= 1.f)
{
return b;
}
else
{
return b * t + (1.f - t) * a;
}
}

Vector4 Lerp(const Vector4& a, const Vector4& b, float t)
{
Vector4 result(
Lerp(a.getX(), b.getX(), t),
Lerp(a.getY(), b.getY(), t),
Lerp(a.getZ(), b.getZ(), t),
Lerp(a.getW(), b.getW(), t)
);
return result;
}

Colour Lerp(const Colour& a, const Colour& b, float t)
{
Colour result;
result.r = Lerp(a.r, b.r, t);
result.g = Lerp(a.g, b.g, t);
result.b = Lerp(a.b, b.b, t);
return result;
}


float Clamp(const float& param, const float& min, const float& max)
{
if (param <= min)
return min;
else if (param >= max)
return max;

return param;

// optimized way below
//return ((param < min) ? min : ((param > max) ? max : param));
}

void CLAMP(float& param, const float& min, const float& max)
{
if (param <= min)
param = min;
else if (param >= max)
param = max;
}

void ColorInterpolation(Vertex & s1, Vertex & s3, Vertex & s4)
{
s4.color.r = (s4.pos.getY() - s1.pos.getY()) *(s3.color.r - s1.color.r) / (s3.pos.getY() - s1.pos.getY()) + s1.color.r;
s4.color.g = (s4.pos.getY() - s1.pos.getY()) *(s3.color.g - s1.color.g) / (s3.pos.getY() - s1.pos.getY()) + s1.color.g;
s4.color.b = (s4.pos.getY() - s1.pos.getY()) *(s3.color.b - s1.color.b) / (s3.pos.getY() - s1.pos.getY()) + s1.color.b;
}

bool isPrimeNumber(const int& num)
{
for (size_t i = 2; i < num; i++)
{
if (num % i == 0)
{
return false;
}
}
return true;
}


float StringToNum(const std::string & str)
{
std::istringstream iss(str);
int num;
iss >> num;
return (float)num;
}


int CharToNum(const char& c)
{
return atoi(&c);
}

float Sigmoid(const float x)
{
return (1 / 1 + exp(-x));
}

unsigned char FloatToByte(const float x)
{
return unsigned char((int)(x * 255.f) % 256);
}

float MapTo0_255f(const float x)
{
float result = Clamp(x, 0.f, 0.999999f) * 255.f; // never dropping value ranging 0~1
if (result - EPSILON >= 1.f)
result = floorf(Clamp(x, 0.f, 0.999999f) * 256.f);
return result;
}

float GetGrayScaleViaGamaCorrection(const Colour& valueToBeCorrected)
{
float numerator = powf(MapTo0_255f(valueToBeCorrected.r), 2.2f) + powf((1.5f*MapTo0_255f(valueToBeCorrected.g)), 2.2f) + powf((0.6f*MapTo0_255f(valueToBeCorrected.b)), 2.2f);
float denominator = 1.f + powf(1.5f, 2.2f) + powf(0.6f, 2.2f);
float result = powf((numerator / denominator), 1.f / 2.2f);
return result;
}

Colour GetGrayScaleViaGamaCorrection(const float sameRGBValue)
{
float numerator = powf(MapTo0_255f(sameRGBValue), 2.2f) + powf((1.5f*MapTo0_255f(sameRGBValue)), 2.2f) + powf((0.6f*MapTo0_255f(sameRGBValue)), 2.2f);
float denominator = 1.f + powf(1.5f, 2.2f) + powf(0.6f, 2.2f);
float result = powf((numerator / denominator), 1.f / 2.2f);
return Colour(result, result, result);
}

float GetBrightnessViaGamaCorrection(const Colour & valueToBeCorrected)
{
float numerator = powf(valueToBeCorrected.r, 2.2f) + powf((1.5f*valueToBeCorrected.g), 2.2f) + powf((0.6f*valueToBeCorrected.b), 2.2f);
float denominator = 1.f + powf(1.5f, 2.2f) + powf(0.6f, 2.2f);
float result = powf((numerator / denominator), 1.f / 2.2f);
return result;
}

Colour GetBrightnessViaGamaCorrection(const float sameRGBValue)
{
float numerator = powf(sameRGBValue, 2.2f) + powf((1.5f*sameRGBValue), 2.2f) + powf((0.6f*sameRGBValue), 2.2f);
float denominator = 1.f + powf(1.5f, 2.2f) + powf(0.6f, 2.2f);
float result = powf((numerator / denominator), 1.f / 2.2f);
return Colour(result, result, result);
}


Vector4 Vector4DotMatrix4f(const Vector4 & vec4, const Matrix4f & m4f)
{
Vector4 result;
result.setX(vec4.getX() * m4f.matrix[0][0] + vec4.getY() * m4f.matrix[1][0] + vec4.getZ() * m4f.matrix[2][0] + vec4.getW() * m4f.matrix[3][0]);
result.setY(vec4.getX() * m4f.matrix[0][1] + vec4.getY() * m4f.matrix[1][1] + vec4.getZ() * m4f.matrix[2][1] + vec4.getW() * m4f.matrix[3][1]);
result.setZ(vec4.getX() * m4f.matrix[0][2] + vec4.getY() * m4f.matrix[1][2] + vec4.getZ() * m4f.matrix[2][2] + vec4.getW() * m4f.matrix[3][2]);
result.setW(vec4.getX() * m4f.matrix[0][3] + vec4.getY() * m4f.matrix[1][3] + vec4.getZ() * m4f.matrix[2][3] + vec4.getW() * m4f.matrix[3][3]);
return result;
}

Actually, some of the APIs can be directly gain from STL or ‘math.h’ while you’re using C++, such as the function ‘RadToDegree’ above can also be found in Lua’s inner math library, but writing them done is a way to apply what you have learnt into practice. Hope you can directly use the ones that the inner libraries provide rather than writing them by yourself so as to avoid mistakes and prevent the performance of your application from being lowered.

Here are some of the APIs when defining Vectors:

1
2
3
4
5
6
7
8
9
10
11
12
13
14
15
16
17
18
19
20
21
22
23
24
25
26
27
28
29
30
31
32
33
34
35
36
37
38
39
40
41
42
43
44
45
46
47
48
49
50
51
52
53
54
55
56
57
58
59
60
61
62
63
64
65
66
67
68
69
70
71
72
73
74
75
76
77
78
79
80
81
82
83
84
85
86
87
88
89
90
91
92
93
94
95
96
97
98
99
100
101
102
103
104
105
106
107
108
109
110
111
112
113
114
115
116
117
118
119
120
121
122
123
124
125
126
127
128
129
130
131
132
133
134
135
136
137
138
139
140
141
142
143
144
145
146
147
148
149
150
151
152
153
154
155
156
157
158
159
160
161
162
163
164
165
166
167
168
169
170
171
172
173
174
175
176
177
178
179
180
181
182
183
184
185
186
187
188
189
190
191
192
193
194
195
196
197
198
199
200
201
202
203
204
205
206
207
208
209
210
211
212
213
214
215
216
217
218
219
220
221
222
223
224
225
226
227
228
229
230
231
232
233
234
235
236
237
238
239
240
241
242
243
244
245
246
247
248
249
250
251
252
253
254
255
256
257
258
259
260
261
262
263
264
265
266
267
268
269
270
271
272
273
274
275
276
277
278
279

/************************************************************************/
/* Vector2 */
/************************************************************************/
void Vector2::operator=(const Vector2 & right)
{
this->setX(right.getX());
this->setY(right.getY());
}

Vector2 Vector2::operator+(const Vector2& right) const
{
Vector2 result(this->getX() + right.getX(), this->getY() + right.getY());
return result;
}

Vector2 Vector2::operator-(const Vector2& right) const
{
Vector2 result(this->getX() - right.getX(), this->getY() - right.getY());
return result;
}

template<typename T>
Vector2 Vector2::operator*(const T& k) const
{
Vector2 result(this->getX() * k, this->getY() * k);
return result;
}

Vector2 Vector2::operator /(const float& k) const
{
if (k == 0.f || abs(k - 0.f) < EPSILON) {
return Vector2();
}
float reciprocalK = 1 / k;
Vector2 result(this->getX()*reciprocalK, this->getY()*reciprocalK);
return result;
}

float Vector2::operator*(const Vector2& right) const
{
return (this->getX() * right.getX() + this->getY() * right.getY());
}

void Vector2::swap(Vector2 & vecA, Vector2 & vecB)
{
if (vecA == vecB)return;
Vector2 tmp(vecA.getX(), vecA.getY());
vecA = vecB;
vecB = tmp;
}

float Vector2::getLength()
{
return sqrtf(powf(this->getX(), 2) + powf(this->getY(), 2));
}


/************************************************************************/
/* Vector3 */
/************************************************************************/
bool Vector3::operator==(const float right) const
{
bool xIsEqual = fabsf(this->getX() - right) <= EPSILON;
bool yIsEqual = fabsf(this->getY() - right) <= EPSILON;
bool zIsEqual = fabsf(this->getZ() - right) <= EPSILON;
return (xIsEqual && yIsEqual && zIsEqual);
}

bool Vector3::operator==(const Vector3 & right) const
{
bool xIsEqual = fabsf(this->getX() - right.getX()) <= EPSILON;
bool yIsEqual = fabsf(this->getY() - right.getY()) <= EPSILON;
bool zIsEqual = fabsf(this->getZ() - right.getZ()) <= EPSILON;
return (xIsEqual && yIsEqual && zIsEqual);
}

Vector3 Vector3::operator+(const Vector3 & right) const
{
Vector3 result(this->getX() + right.getX(), this->getY() + right.getY(), this->getZ() + right.getZ());
return result;
}

Vector3 Vector3::operator-(const Vector3 & right) const
{
Vector3 result(this->getX() - right.getX(), this->getY() - right.getY(), this->getZ() - right.getZ());
return result;
}

Vector3 Vector3::operator*(const float k) const
{
Vector3 result(this->getX() * k, this->getY() * k, this->getZ() * k);
return result;
}


float Vector3::operator*(const Vector3 & right) const
{
return (this->getX()*right.getX() + this->getY()*right.getY() + this->getZ()*right.getZ());
}

template<typename T>
Vector3 Vector3::operator*(const T& right) const
{
Vector3 result(
this->getX()*right.matrix[0][0] + this->getY()*right.matrix[0][1] + this->getZ() * right.matrix[0][2],
this->getY()*right.matrix[1][0] + this->getY()*right.matrix[1][1] + this->getZ() * right.matrix[1][2],
this->getZ()*right.matrix[2][0] + this->getY()*right.matrix[2][1] + this->getZ() * right.matrix[2][2]);
return result;
}

Vector3 Vector3::operator^(const Vector3 & right) const
{
Vector3 result;
result.setX(this->getY() * right.getZ() - this->getZ() * right.getY());
result.setY(this->getZ() * right.getX() - this->getX() * right.getZ());
result.setZ(this->getX() * right.getY() - this->getY() * right.getX());
return result;
}

void Vector3::Normalize()
{
float length = sqrtf(powf(this->getX(), 2) + powf(this->getY(), 2) + powf(this->getZ(), 2));
this->setX(this->getX() / length);
this->setY(this->getY() / length);
this->setZ(this->getZ() / length);
}

Vector3 Vector3::Normalize(const Vector3& vecToBeNormalized)
{
Vector3 result;
float length = sqrtf(powf(vecToBeNormalized.getX(), 2) + powf(vecToBeNormalized.getY(), 2) + powf(vecToBeNormalized.getZ(), 2));
result.setX(vecToBeNormalized.getX() / length);
result.setY(vecToBeNormalized.getY() / length);
result.setZ(vecToBeNormalized.getZ() / length);
return result;
}

float Vector3::getLength()
{
return sqrtf(powf(this->getX(), 2) + powf(this->getY(), 2) + powf(this->getZ(), 2));
}


/************************************************************************/
/* Vector4 */
/************************************************************************/
bool Vector4::operator==(float right) const
{
bool xIsEqual = fabsf(this->getX() - right) <= EPSILON;
bool yIsEqual = fabsf(this->getY() - right) <= EPSILON;
bool zIsEqual = fabsf(this->getZ() - right) <= EPSILON;
bool wIsEqual = fabsf(this->getW() - right) <= EPSILON;
return (xIsEqual && yIsEqual && zIsEqual && wIsEqual);
}

bool Vector4::operator==(const Vector4 & right) const
{
bool xIsEqual = fabsf(this->getX() - right.getX()) <= EPSILON;
bool yIsEqual = fabsf(this->getY() - right.getY()) <= EPSILON;
bool zIsEqual = fabsf(this->getZ() - right.getZ()) <= EPSILON;
bool wIsEqual = fabsf(this->getW() - right.getW()) <= EPSILON;
return (xIsEqual && yIsEqual && zIsEqual && wIsEqual);
}

bool Vector4::operator!=(const Vector4 & right) const
{
bool xIsInequal = fabsf(this->getX() - right.getX()) > EPSILON;
bool yIsInequal = fabsf(this->getY() - right.getY()) > EPSILON;
bool zIsInequal = fabsf(this->getZ() - right.getZ()) > EPSILON;
bool wIsInequal = fabsf(this->getW() - right.getW()) > EPSILON;
return (xIsInequal || yIsInequal || zIsInequal || wIsInequal);
}

Vector4 Vector4::operator +(const Vector4 & right) const
{
Vector4 result(this->getX() + right.getX(), this->getY() + right.getY(), this->getZ() + right.getZ(), this->getW() + right.getW());
return result;
}

Vector4 Vector4::operator-(const Vector4 & right) const
{
Vector4 result(this->getX() - right.getX(), this->getY() - right.getY(), this->getZ() - right.getZ(), this->getW() - right.getW());
return result;
}

Vector4 Vector4::operator*(const float k) const
{
Vector4 result(this->getX()*k, this->getY()*k, this->getZ() *k, this->getW() *k);
return result;
}

Vector4 Vector4::operator/(const float k) const
{
float reciprocalK = 1 / k;
Vector4 result(this->getX()*reciprocalK, this->getY()*reciprocalK, this->getZ() *reciprocalK, this->getW() *reciprocalK);
return result;
}

float Vector4::operator *(const Vector4 & right) const
{
return this->getX()*right.getX() + this->getY()*right.getY() + this->getZ()*right.getZ() + this->getW()*right.getW();
}

Vector4 Vector4::operator ^(const Vector4& right) const
{
Vector4 result(this->getY()*right.getZ() - this->getZ()*right.getY(),
this->getZ()*right.getX() - this->getX()*right.getZ(),
this->getX()* right.getY() - this->getY()*right.getX());

return result;
}

Vector4 Vector4::getInterpolateVector(const Vector4 & vecA, const Vector4 & vecB, float factor)
{
Vector4 result(
LinearInerpolate(vecA.getX(), vecB.getX(), factor),
LinearInerpolate(vecA.getY(), vecB.getY(), factor),
LinearInerpolate(vecA.getZ(), vecB.getZ(), factor),
1.f
);
return result;
}

Vector4 Vector4::getQuaternion(const Vector3 & lastPoint, const Vector3 & currentPoint)
{
Vector4 result;

Vector3 perp = lastPoint ^ currentPoint;
if (perp.getLength() > EPSILON)
{
result.setX(perp.getX());
result.setY(perp.getY());
result.setZ(perp.getZ());
// w=cos(rotationAngle/2) ---> formula
result.setW(lastPoint * currentPoint);
}
else
{
result.setX(.0f);
result.setY(.0f);
result.setZ(.0f);
result.setW(.0f);
}

return result;
}

void Vector4::Normalize()
{
float length = sqrtf(powf(this->getX(), 2) + powf(this->getY(), 2) + powf(this->getZ(), 2));
this->setX(this->getX() / length);
this->setY(this->getY() / length);
this->setZ(this->getZ() / length);
}

Vector4 Vector4::GetNormalizedVector() const
{
Vector4 result;
float length = sqrtf(powf(this->getX(), 2) + powf(this->getY(), 2) + powf(this->getZ(), 2));
result.setX(this->getX() / length);
result.setY(this->getY() / length);
result.setZ(this->getZ() / length);
return result;
}

bool Vector4::swap(Vector4 & v1, Vector4 & v2)
{
if (v1 != v2)
{
std::swap(v1.m_x, v2.m_x);
std::swap(v1.m_y, v2.m_y);
std::swap(v1.m_z, v2.m_z);
std::swap(v1.m_w, v2.m_w);
}
return true;
}


Rendering pipeline

Learning the rendering pipeline is crucial for the study of computer graphics.


Here are three major stages in the rendering pipeline:

  1. Application Stage
  2. Geometry Conduction Stage
  3. Rasterization Stage


1. Application Stage

In this stage, all of the elements you got is in its original state. For example, if you’re going to read the positions of an OBJ formatted model in to the computer buffer so as to construct each of the position into a vertex and then calculate them later, you should have a formatted OBJ model first and then read those positions into a vector orderly. Whatever your model’s format is, FBX, MTL or any other formats, reading into the position information to a vector is the first step.

Besides the positions information, there are still lots of information such as the texture coordinates, the normal vector, the blend weights and blend shapes, the bone weights to read from a file(OBJ, FBX, MTL, etc,.) that holds the models information. These information builds up the attributes of a vertex. Just take the texture coordinate (in the project it is name “Texcoord”) for example. The texture coordinate, as a basic attribute of a vertex, it includes the information about a vertex’s U axis and V axis, which informs us the way to put texture on the model.

Finally, as these information(the texture coordinates, the normal vector, the blend weights and blend shapes, the bone weights) are stored in a vertex orderly and correctly, a simple but formal vertex is born. Its structure should be like the structure shown below:

1
2
3
4
5
6
7
struct SimpleVertex
{
Vector4 pos;
Colour color;
Texcoord tex;
Vector4 normal;
};

You might see that the Vertex struct is simple compared with the ones you might ever seen in other materials, as I have excluded many of the attributes for this vertex struct like the blend weight, the blend shapes and the bone weights that I have described in the paragraph above. Also, the attributes like “rhw”, which represents the reciprocal of homogenous W, is not shown directly in this chapter just for the convenience of clarifying the process of the Application Stage, but they will later be added in.


Let’s take a closer look at the inside of this simple vertex.

You may realize that the position attribute in our vertex is a four-dimensional vector rather than a 3D one. So what does the fourth dimension represents for? Why we use a four-dimensional vector to store a position in a three-dimensional scene? Actually the W, which is the forth dimension, represents for the homogeneous coordinate. Now tha question lingers that why we use homogeneous coordinate while 3D coordinate is enough?
The answer of the questions above lays on the three factors below:

(1) It plays an important role when conducting homogeneous transformation. The Homogeneous Transformation Matrix For 3D Bodies is shown below. You will notice that it will be easier for multiple matrices’ multiplication if you use have N+1 dimensions than directly calculating N dimensional matrices. Especially the rotation will be more convenient for the quaternion itself demands 4 dimensional vector.

CG

(2) In real world, two parallel lines will never meet with one another mathematically, but in perspective(human-eye) projection it will. In Euclidean space(geometry), two parallel line on the same plane cannot interest, or cannot cannot meet each other forever. Euclidean space describe our 2D or 3D space so well, but they are not sufficient to handle the projective space. What if this point goes far away to infinity? The point at infinity would be (∞, ∞) and it becomes meaningless in Euclidean space. The parallel lines should meet at infinity in projective space, but cannot do in Euclidean space. Mathematicians have discovered a way to solve this issue: Homogeneous Coordinate. Adding the W as the forth dimension can transform a vertex from Euclidean space to projective space while dividing to W can transform it back.
For example:

  • A = (x1, y1, z1)
  • B = (x2, y2, z2)
  • A // B
1
αx1 + βy1 + θz1 + d = 0
1
αx2 + βy2 + θz2 + d = 0

In perspective projection, even though these two lines are parallel, they still intersect in some point. But how to get that intersected point? Just add the homogeneous coordinate like I did below:

1
(αx1/w)*w + (βy1/w)*w + (θz1/w)*w + dw = 0
1
(αx2/w)*w + (βy2/w)*w + (θz2/w)*w + dw = 0

Then we will find out a point that intersects the two parallel lines in projective space.

(3) It’s easy to find out a vector from a point. The point, or the position is described as (x, y, z, 1) while a vector is described as (x, y, z, 0).

(4) It will be easier to describe the intersection points of lines with lines and planes with planes.


Here is the structure of a four-dimensional vector. You’ll notice that the struct Vector4 actually has 4 dimensions: X, Y, Z and W, and all of them are defined in ‘float’ type rather than double or integer. Because either using an ‘integer’ type or a ‘double’ type is inappropriate in this circumstance. Using an ‘integer’ may lose the detail of a position while using a ‘double’ type may be space-consuming.

Now here is a significant question that why we choose to use 4 dimensional vector to describe a position in 3 dimensional space while the 3 dimensional vector is enough? What is the forth dimension ‘w’ actually? Answer to these questions have actually been answered above.

1
2
3
4
5
6
7
struct Vector4
{
float X;
float Y;
float Z;
float W;
};

In order to make the four-dimensional vector available and convenient to use in a real project, we have to make some APIs for it. The class below shows a more mature structure of a four-dimensional vector, including initialization constructor, copy constructor, overridden operators, and ‘get()s’ and ‘set()s’ for needed private members.

1
2
3
4
5
6
7
8
9
10
11
12
13
14
15
16
17
18
19
20
21
22
23
24
25
26
27
28
29
30
31
32
33
34
35
36
37
38
39
40
41
42
43
44
45
46
47
48
49
50
51
52
53
54
55
56
57
58
59
class Vector4
{
public:
Vector4() :
m_x(0), m_y(0), m_z(0), m_w(0) {};
Vector4(const Vector4& vecToBeCopied) {
this->setX(vecToBeCopied.getX());
this->setY(vecToBeCopied.getY());
this->setZ(vecToBeCopied.getZ());
this->setW(vecToBeCopied.getW());
};
Vector4(const Vector3& vecToBeCopied, bool isPoint = false) {
this->setX(vecToBeCopied.getX());
this->setY(vecToBeCopied.getY());
this->setZ(vecToBeCopied.getZ());
if (isPoint)this->setW(1);
else this->setW(0);
};
Vector4(const float& a0, const float& a1, const float& a2, const float& a3 = 0) :
m_x(a0), m_y(a1), m_z(a2), m_w(a3) {};
~Vector4() {};
bool operator ==(float right)const;
bool operator ==(const Vector4& right)const;
bool operator !=(const Vector4& right)const;
Vector4 operator +(const Vector4& right)const;
Vector4 operator -(const Vector4& right)const;
Vector4 operator *(const float k)const;
Vector4 operator /(const float k)const;
float operator *(const Vector4& right)const;
Vector4 operator ^(const Vector4& right)const; // vector cross product
Vector4 getInterpolateVector(const Vector4& vecA, const Vector4& vecB, float factor);
Vector4 getQuaternion(const Vector3 & lastPoint, const Vector3 & currentPoint);
void Normalize();
Vector4 GetNormalizedVector() const;
static bool swap(Vector4& v1, Vector4& v2);

float getX()const { return m_x; }
float getY()const { return m_y; }
float getZ()const { return m_z; }
float getW()const { return m_w; }
float getR()const { return m_x; }
float getG()const { return m_y; }
float getB()const { return m_z; }
float getA()const { return m_w; }
void setX(const float& x) { m_x = x; }
void setY(const float& y) { m_y = y; }
void setZ(const float& z) { m_z = z; }
void setW(const float& w) { m_w = w; }
void setR(const float& r) { m_x = r; }
void setG(const float& g) { m_y = g; }
void setB(const float& b) { m_z = b; }
void setA(const float& a) { m_w = a; }

private:
float m_x;
float m_y;
float m_z;
float m_w;
};

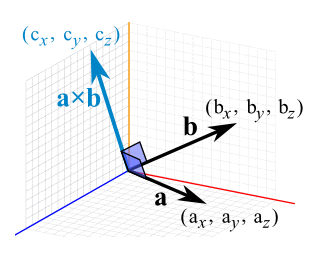
Among initialization constructor, copy constructor, overridden operators, the overridden of the vector is closely related to the mathematics. No need to mention that the operators ‘plus’ and ‘minus’ are easy to understand, but the overridden operators of ‘*' and ‘^' are a little bit hard to understand. I use the overridden operator for ‘*' to represent the inner product of two vectors, while using ‘^' to represent the cross product(namely: outer product) of the two vectors.

We need to know the differences between the inner product and the cross product.

The inner product of the 2 vectors is just to make the two vector multiply in mathematical way, the detail of the inner product of 2 vectors is shown below.

An inner product is a generalization of the dot product. In a vector space, it is a way to multiply vectors together, with the result of this multiplication being a scalar. A simple inner product of the two vectors is shown below

1
A*B = ||A||*||B||*cos(θ)

The cross product of the 2 vectors is totally different for just multiplying the vectors and it has distinct meaning from the inner product. The detail of the cross product of 2 vectors is shown below.

The Cross Product a × b of two vectors is another vector that is at right angles to both:

CG

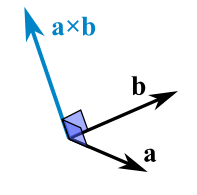
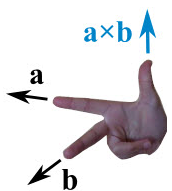
The cross product could point in the completely opposite direction and still be at right angles to the two other vectors, so we have the: Right Hand Rule.

CG

The magnitude (length) of the cross product equals the area of a parallelogram with vectors a and b for sides:

CG

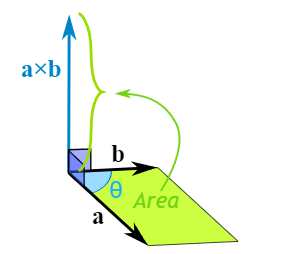
See how it changes for different angles:

CG

The cross product (blue) is:

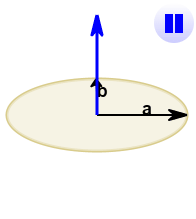
  • zero in length when vectors a and b point in the same, or opposite, direction
  • reaches maximum length when vectors a and b are at right angles

And it can point one way or the other!

So how do we calculate it?

We can calculate the Cross Product this way:
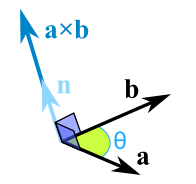
CG

1
a × b = |a|*|b|*sin(θ)*n
  • |a| is the magnitude (length) of vector a
  • |b| is the magnitude (length) of vector b
  • θ is the angle between a and b
  • n is the unit vector at right angles to both a and b

OR we can calculate it this way:
When a and b start at the origin point (0,0,0), the Cross Product will end at:

  • cx = aybz − azby
  • cy = azbx − axbz
  • cz = axby − aybx

CG


Next, there is a color attribute in our vertex called ‘SimpleVertex’. The color attribute is defined as a Colour type, which is also a self-defined type like ‘Vector4’. The color attribute stores a position’s color information, so that we can achieve lighting based on it. The inside of the ‘Colour’ type can also be regarded as a C++ struct, its structure is shown as below:

1
2
3
4
5
6
7
struct Colour 
{
float Red;
float Green;
float Blue;
float Alpha; // (In my final project, alpha is not used.)
};

Its outlined structure is so simple that only contains three float members to represent three primary colors of the light, including a number to represent the alpha.

Also, in order to use it in the real project more conveniently, basic APIs should be added into the ‘Colour’ structure above, as well as some more color-related APIs. The final structure of the color will be like the one below:

1
2
3
4
5
6
7
8
9
10
11
12
13
14
15
16
17
18
19
20
21
22
23
24
25
26
27
28
29
30
31
32
33
34
35
36
37
38
39
40
41
42
43
44
45
46
47
48
49
50
51
52
53
54
55
56
57
58
59
60
61
62
63
64
65
66
67
68
69
70
71
72
73
74
75
76
77
78
79
80
81
82
83
84
85
86
87
88
89
struct Colour 
{
Colour() = default;
Colour(const float red, const float green, const float blue) :
r(red), g(green), b(blue){}
Colour(const Colour& right)
{
this->r = right.r;
this->g = right.g;
this->b = right.b;
}

bool operator ==(const Colour& right)
{
if (this->r - right.r <= EPSILON
&& this->g - right.g <= EPSILON
&& this->b - right.b <= EPSILON)
{
return true;
}
else {
return false;
}
}

Colour& operator =(const Colour& right)
{
if (this == &right)
{
return *this;
}
this->r = right.r;
this->g = right.g;
this->b = right.b;
return *this;
}
Colour ClampColor(Colour& color)
{
Clamp(color.r, 0.f, 1.f);
Clamp(color.g, 0.f, 1.f);
Clamp(color.b, 0.f, 1.f);
return color;
}
Colour operator /(const float right) {
Colour result;
result.r = this->r / right;
result.g = this->g / right;
result.b = this->b / right;
return result;
}
Colour operator *(const Colour& right) const
{
Colour result;
result.r = this->r * right.r;
result.g = this->g * right.g;
result.b = this->b * right.b;
return result;
}
Colour operator *(const float& right) const
{
Colour result;
result.r = this->r * right;
result.g = this->g * right;
result.b = this->b * right;
return result;
}
Colour operator +(const Colour& right)
{
Colour result;
result.r = this->r + right.r;
result.g = this->g + right.g;
result.b = this->b + right.b;
return result;
}
Colour operator -(const Colour& right)
{
Colour result;
result.r = this->r - right.r;
result.g = this->g - right.g;
result.b = this->b - right.b;
return result;
}
Colour& operator *=(const Colour& right)
{
return (*this) = (*this * right);
}

float r, g, b;
};

One important thing to mention in the code above is the comparison of the two float-typed numbers. In computer, a float-type number may well not be the exact number we saw on log, it may hide subtle bias behind its decimal point, especially those float-type numbers after having mathematical operations. Remember that 1.0 - 1.0 in computer may not be 0 at all. To avoid this, we have to use subtraction and epsilon when comparing 2 float-type(or double-type) numbers. For example, if you want to know whether two float-type numbers are equal, subtraction of these two numbers is the first step, then just compare the subtracted result with the epsilon---a pretty tiny number that we have previously defined before. If the result is smaller than the epsilon, it means that the two float-type numbers are equal, vice versa.


Besides the basic APIs and operators we have mentioned above when talking about the ‘Vector4’, here we can see a different API called ‘ClampColor(Colour& color)’. As the word’s own meaning goes, the Clamp is a way to clamp some number in or der to make it into the range previously set, let’s just call that range ‘valid range’. So it is a simple conduction just to avoid the number being outside the bounds of range. For example, if you only want to ensure the digits you get are within the range of x and y, mathematically written as [x, y], you can just take y — which is the roof of the range — if some number is bigger than y, vice versa. The code below shows how does the clamping works:

1
2
3
4
5
6
7
8
float Clamp(const float& param, const float& min, const float& max)
{
if (param <= min)
return min;
else if (param >= max)
return max;
return param;
}

An optimization is just shown below:

1
2
3
4
float Clamp(const float& param, const float& min, const float& max)
{
return ((param < min) ? min : ((param > max) ? max : param));
}

But why we clamp colors?

As a common sense that we can use 01 or 0255 to represent a color’s attribute(R, G, B, A). In this case, we use 0~1. So this demands each of the color lies within the range of [0, 1]. In calculating float-type-based colors, because of the complex algorithm we use, it is almost possible that we gain a number outside the range we want. So clamping is always necessary.


The third member in our vertex is ‘Texcoord’, which represents texture coordinate, and its structure is very simple that only has two float-typed member, one is ‘U’ and the other is ‘V’. Just see the struct below:

1
2
3
4
5
struct Texcoord 
{
float U;
float V;
};

Texture coordinates, also called UVs, are pairs of numbers stored in the vertices of a mesh.

These numbers are often used to stretch a 2D texture onto a 3D mesh, but they can be used for other things like coloring the mesh, controlling the flow across the surface , etc.

Game engines commonly use two texture coordinates, U and V, for mapping the width and height of a texture. A third axis W can also be used for depth if you are using a 3D volume texture, but usually this coordinate is removed for efficiency.

Texture coordinates are measured in a scale of 0.0 to 1.0, with 0.0 and 1.0 at opposite sides of the texture. When a model has a UV distance greater than 1 (for example, UV goes from -1 to 2) then the texture will tile across the model.

These numbers are usually hidden from the artist, replaced by helpful visual representations of how the textures are projected. Planes, cylinders and spheres help the artist align the textures in a visual way, but it helps to know that games only see the UV numbers that these shapes create.

Texture coordinates define how an image (or portion of an image) gets mapped to a geometry. A texture coordinate is associated with each vertex on the geometry, and it indicates what point within the texture image should be mapped to that vertex.
Each texture coordinate is, at a minimum, a (u,v) pair, which is the horizontal and vertical location in texture space, respectively. The values are typically in the range of [0,1]. The (0,0) origin is at the lower left of the texture.
For (u,v) values outside the range of [0,1], the Texture Wrap Style property describes how this is handled.
Texture coordinates may also have optional values “w” and “q”. This is often represented as (u,v,w,q). These coordinates are both optional, so you may have, for example, (u,v,w) or (u,v,q).
The ‘w’ is used for more complex texture mapping in 3D space and is seen relatively infrequently in most workflows. This mapping in 3D may be in relation to 3D textures or 2D texture variations in 3D such as shadows. It can also be used with 2D textures that are intended to represent complex irregular surfaces in 3D.
The ‘w’ is used when rendering, in conjunction with the texture’s transformation values such as rotation, shearing, scaling, and offset. w is an extra value against which to multiply the texture transformation values, and may be used when you want to take perspective into account (such as in shadow mapping). It works the same as when you transform a location in object-space to 3D (solid) screen-space via a world-view-projection matrix. By multiplying the uvw with projection transformation values, you end up with two coordinates (often called s and t) which are then mapped onto a 2D texture.
The ‘q’ is used to scale texture coordinates when employing techniques such as projective interpolation. For most use cases, if a system can only handle (u,v) texture coordinates and is instead offered (u,v,q) values, a location of (u/q,v/q) may be used.


As we have took so much time on introducing the basic elements called ‘vertex’, we are sure that we have appropriate data structures to store the basic information of a 3D model. Let’s go on to the next step: Reading the model into the memory, which means that we are going to use our vertex-typed container to store each of the vertex from a 3D model. In C++, its convenient that we can use ‘vector’ in STL as a list to store all of the information we read from the model. Using ‘vector<SimpleVertex>‘ to represent a list of ‘SimpleVertex’ that we have just constructed above. Then comes the reading of a 3D model file. In this case we use OBJ format as it’s file structure is easier understand and visible in file format rather than a binary format like other model files. Lets take a simple look at the content of an file with OBJ format:

1
2
3
4
5
6
7
8
9
10
11
12
13
14
15
16
17
18
19
20
21
22
23
24
25
26
27
28
29
30
31
32
33
34
# File Created: 25.02.2021 17:35:16
# object Teapot001

v 0.279771417379 0.523323953152 0.361592650414
v 0.256112784147 0.523323953152 0.481412023306
v 0.252184033394 0.539422273636 0.479740440845
... ... ... ## details ignored
v 0.207081869245 0.542744159698 0.262634694576
v 0.235997557640 0.523323953152 0.250331819057
# 529 vertices

vn -0.966742336750 -0.255752444267 -0.000000119668
vn -0.893014192581 -0.256344825029 -0.369882434607
vn -0.893437385559 0.255995273590 -0.369101703167
vn -0.966824233532 0.255442529917 -0.000000077787
... ... ... ## details ignored
vn 0.350497841835 0.925311684608 -0.144739553332
vn 0.485588967800 0.850653529167 -0.201474279165
# 530 vertex normals

vt 2.000000000000 2.000000000000 0.000000000000
vt 1.750000000000 2.000000000000 0.000000000000
... ... ... ## details ignored
vt 0.375000000000 0.999999880791 0.000000000000
# 323 texture coords

o Teapot001
g Teapot001
f 1/1/1 2/2/2 3/3/3
f 3/3/3 4/4/4 1/1/1
... ... ... ## details ignored
f 528/250/529 471/254/472 473/256/474
f 473/256/474 529/252/530 528/250/529
# 1024 faces

The content of the OBJ file above is a pretty simple once, with many details ignored but the whole structure is entirely considered. The ‘#’ can be regarded as comments, there is no headers or tails in any OBJ files. Beginning with the vertex data, the ‘v’ represents the geometric vertices, ‘vt’ means ‘texture vertices’, ‘vn’ is ‘vertex normals’, and in some of the OBJ files there is ‘vp’, which means the parameter space vertices. Then comes the groups, ‘o’ is for the name of the object, ‘g’ is for the name of the group. The ‘f’ is crucial for it means ‘face’, the vertex indexes are split by ‘/‘, and always remember that the structure is mainly controlled by geometric vertices and the faces. We just stop deepening into the content of the file format as the detailed introduction about the OBJ file can be found online if you’re interested. Besides, you can even use FBX in your project rather than this kind of simple OBJ files.

Next, just I’m gonna show you the way to read OBJ file into our vertex container, namely, the computer memory we have constructed before. You can see that I divides the OBJ model data into the types(‘v’, ‘vt’, ‘vn’, ‘f’) before reading into the container just in accordance with the content of the files mentioned above.

1
2
3
4
5
6
7
8
9
10
11
12
13
14
15
16
17
18
19
20
21
22
23
24
25
26
27
28
29
30
31
32
33
34
35
36
37
38
39
40
41
42
43
44
45
46
47
48
49
50
51
52
53
54
55
56
57
58
59
60
61
62
63
64
65
66
67
68
69
70
71
72
73
74
75
76
77
78
79
80
81
82
83
84
85
86
87
88
89
90
91
92
93
94
95
96
97
98
99
100
101
102

void ReadOBJFileIntoOBJModel(const std::string& path, ModelInfo* obj)
{
std::ifstream in;
in.open(path, std::ifstream::in);
if (in.fail()) return;
if (in)
{
int vertexIndex = 0;
int vertexCount = 0;

std::vector<Vector4> verts;
std::vector<Vector3> texs;
std::vector<Vector4> norms;
std::string line;
float maxVx = -FLT_MAX, maxVy = -FLT_MAX, maxVz = -FLT_MAX;
float minVx = FLT_MAX, minVy = FLT_MAX, minVz = FLT_MAX;
while (!in.eof()) {
std::getline(in, line);
std::istringstream iss(line.c_str());
char trash;
if (!line.compare(0, 2, "v ")) {
iss >> trash;
float x, y, z;
iss >> x;
iss >> y;
iss >> z;
Vector4 v(x, y, z, 1.f);
Vertex newVertex;
newVertex.pos = v;
obj->vertexVec.push_back(newVertex);
vertexCount++;
maxVx = std::fmaxf(maxVx, v.getX());
maxVy = std::fmaxf(maxVy, v.getY());
maxVz = std::fmaxf(maxVz, v.getZ());
minVx = std::fminf(minVx, v.getX());
minVy = std::fminf(minVy, v.getY());
minVz = std::fminf(minVz, v.getZ());
}
else if (!line.compare(0, 3, "vt ")) {
iss >> trash;
iss >> trash;
float u, v;
iss >> u;
iss >> v;
if (u > 1.0f) u -= std::floor(u);
if (v > 1.0f) v -= std::floor(v);
obj->vertexVec[vertexIndex].tex = { u, v };
obj->vertexVec[vertexIndex].rhw = 1.0f;
vertexIndex++;
if (vertexIndex == vertexCount)
{
vertexIndex = 0;
}
}
else if (!line.compare(0, 3, "vn ")) {
iss >> trash;
iss >> trash;
float x, y, z;
iss >> x;
iss >> y;
iss >> z;
obj->vertexVec[vertexIndex].normal = Vector4(x, y, z, 0.f);
vertexIndex++;
if (vertexIndex == vertexCount)
{
vertexIndex = 0;
}
}
else if (!line.compare(0, 2, "f ")) {
std::vector<int> v;
std::vector<int> t;
std::vector<int> n;
int vx, vy, vz;
int tx, ty, tz;
int nx, ny, nz;

iss >> trash;
iss >> vx >> trash >> tx >> trash >> nx >>
vy >> trash >> ty >> trash >> ny >>
vz >> trash >> tz >> trash >> nz;

VerticeIndex indexes;
if (MODEL_PATH == "assets/Tonny.obj") {
indexes = { vx , vy, vz };
}
else
{
indexes = { vz , vy, vx }; // some obj files's vertex order is different (For Back Culling Correctly)
}
obj->verteciesIndexVec.push_back(indexes);
}
}
Vector4 center = Vector4((maxVx + minVx) / 2, (maxVy + minVy) / 2, (maxVz + minVz) / 2, 1.0f);

in.close();
}
else
{
std::cout << "No such file or path named \'" << path << "\' !" << std::endl;
}
}

By now, we have prepared a model data well. As you can see that the application stage is conducted in CPU, the programmer has the full control on every step and operation happened in this stage. You can try to reduce the count of the triangle during this stage in order to render it fast in the next stage, but the cost is obvious that the detail may lose. The CPU will send the data(model data which combined with vertices, vertices which includes positions, normals and texture coordinates) we stored into the hardware for the stage.


2. Geometry Stage

The model data prepared and sent from the application stage will be used as the input content for geometry stage. The main tasks of the geometry stage is to tranfer the vertices, do the clippings, shad lights, make projections and conduct screen mappings.

First and foremost, in order to make the mathematical calculations more unified, I have to mention that I use radiant(0~Π→0~180°) while describing an Euler angle, and use 0~1 rather than 0~255 while describing a color value, and use ‘vector • matrix’(vector-on-the-right-side) rule. The matrix are in ‘row-first’ order. Left-hand coordinate is used while doing geometric transforms.

In this stage there is a very important process called ‘MVP Transformation’, which is actually the combination of the ‘Model Transform’(the process during which we transform the model into its own space to the world space), ‘View Transform’(the process during which we transform the model from the world space into the view space) and the ‘Projection Transform’(the process during which we make the projection to the models in view space and transform it into the projection space). Let’s take a look at the detailed process of the geometry stage step by step.

Firstly, we have to transfer the model from its own space into the world space, but what is a ‘world space’? The world space is actually a space that holds all of the models, formally: objects. It should be able to hold all the objects with universal rules. The rule is originated from the world coordinates, which means that the world coordinate itself is a universal rule to all of the objects that are being rendered in the world space. Once we have learnt the origin of the universal rules, we are able to describe it in math, and you will find that describing a coordinate is simple in mathematics. It is a common sense that the coordinates can be easily described via matrix. As we can use a unit vector to form the base of a vector space, every vector in the space can be expressed as the linear combination of unit vectors, we can use a unit matrix to form the base of a matrix space. This means that the world space coordinate should be a unit matrix, so as to hold all the other objects. Thus the world space is created. Generally, we regard a unit matrix as a world space matrix, a world space, a world coordinate. A unit matrix is shown below, which can represent the world matrix. We can use a 3x3 matrix to represent a 3D space, but we choose 4x4 matrix, why? Because the position of our vertex is constructed in 4 dimension, with ‘w’ which represents the homogeneous coordinate. And we know that the mathematical rule does not allow us make arithmetic operations between a 3x3 matrix and a vector4. Also, the homogeneous coordinate W is crucial in the next steps that we can not lose it, we have to store it so as to use it later. As we use 2 dimentional array to define a matrix, we have to be clear about the inner side of it. In computing, row-major order and column-major order are methods for storing multidimensional arrays in linear storage such as random access memory. The difference between the orders lies in which elements of an array are contiguous in memory. In row-major order, the consecutive elements of a row reside next to each other, whereas the same holds true for consecutive elements of a column in column-major order. While the terms allude to the rows and columns of a two-dimensional array, i.e. a matrix, the orders can be generalized to arrays of any dimension by noting that the terms row-major and column-major are equivalent to lexicographic and co-lexicographic orders, respectively. Data layout is critical for correctly passing arrays between programs written in different programming languages. It is also important for performance when traversing an array because modern CPUs process sequential data more efficiently than non-sequential data. This is primarily due to CPU caching which exploits spatial locality of reference. In addition, contiguous access makes it possible to use SIMD instructions that operate on vectors of data. In some media such as tape or NAND flash memory, accessing sequentially is orders of magnitude faster than non-sequential access. We cannot clearly see whether the world matrix shown below is in row-major order or in column-major order for it is a unit matrix and the transpose of a unit matrix is actually itself, but I have to mention that all the matrices defined in this book and used in the relevant final project is in row-major order.

1
2
3
4
5
6
WorldMatrix = {
{1, 0, 0, 0}
{0, 1, 0, 0}
{0, 0, 1, 0}
{0, 0, 0, 1}
};

Then we have to place our models into the world space. As we have stored the model in a vertex which contains the attribute of position in 4 dimentional vector type, we can just multiply each of the position vectors with the world space matrix, thus transforming the positions of the model from its own space into the world space.

1
(type:matrix4f)ModelInWorldSpace = (type:vector4)ModelVertices[n].position * (type:matrix4f)WorldMatrix

Notice that all of the interactions on the object/models come from user side is applied on the models/objects in world space. This means that the rotation transform, scale transform and translation transform are conducted directly after we placed the models/objects in the world space through world matrix. First we have to map the user interaction from screen to 3D space if needed, for example, it’s needed that we map the rotation angle from 2D screen into 3D virtual world space if we want the user interact directly through the 2D screen when changing the rotation of the models/objects. Just multiplying the world matrix with the transform matrices will make the objects/models transform in the way we want. But how to describe our transform for the objects/models? Here are the details of the rotation matrix, scale matrix and transformation matrix that we should bear in mind:

Rotate by X-axis

1
2
3
4
5
6
RotationXMatrix = {
{1, 0, 0, 0}
{0, cos(θ), sin(θ), 0}
{0, -sin(θ), cos(θ), 0}
{0, 0, 0, 1}
};

Rotate by Y-axis

1
2
3
4
5
6
RotationYMatrix = {
{cos(θ), 0, -sin(θ), 0}
{0, 1, 0, 0}
{sin(θ), 0, cos(θ), 0}
{0, 0, 0, 1}
};

Rotate by Z-axis

1
2
3
4
5
6
RotationZMatrix = {
{cos(θ), sin(θ), 0, 0}
{-sin(θ), cos(θ), 0, 0}
{sin(θ), 0, 1, 0}
{0, 0, 0, 1}
};

The way to build out these matrices in C++ goes like the codes below:

1
2
3
4
5
6
7
8
9
10
11
12
13
14
15
16
17
18
19
20
21
22
23
24
25
26
27
28
29
30
31
32
33
34
35
36
37
38
39
40
41
42
43
44
45
46
47
48
49
50
51
52
53
54
55
56
57
   Matrix4f Matrix4f::getRotateXMatrix(const float& thetaX)
{
Matrix4f rotateXMatrix;

float angle = RadToDegree(thetaX);

rotateXMatrix.matrix[0][0] = 1.0f;
rotateXMatrix.matrix[3][3] = 1.0f;

float cosine = (float)cos(angle);
float sine = (float)sin(angle);
rotateXMatrix.matrix[1][1] = cosine;
rotateXMatrix.matrix[2][2] = cosine;
rotateXMatrix.matrix[1][2] = sine;
rotateXMatrix.matrix[2][1] = -sine;

return rotateXMatrix;
}

Matrix4f Matrix4f::getRotateYMatrix(const float& thetaY)
{
Matrix4f rotateYMatrix;

float angle = RadToDegree(thetaY);

rotateYMatrix.matrix[1][1] = 1.0f;
rotateYMatrix.matrix[3][3] = 1.0f;

float cosine = (float)cos(angle);
float sine = (float)sin(angle);
rotateYMatrix.matrix[0][0] = cosine;
rotateYMatrix.matrix[2][2] = cosine;
rotateYMatrix.matrix[0][2] = -sine;
rotateYMatrix.matrix[2][0] = sine;

return rotateYMatrix;
}

Matrix4f Matrix4f::getRotateZMatrix(const float& thetaZ)
{
Matrix4f rotateZMatrix;

rotateZMatrix.matrix[2][2] = 1.0f;
rotateZMatrix.matrix[3][3] = 1.0f;

float angle = RadToDegree(thetaZ);

float cosine = (float)cos(angle);
float sine = (float)sin(angle);
rotateZMatrix.matrix[0][0] = cosine;
rotateZMatrix.matrix[1][1] = cosine;
rotateZMatrix.matrix[0][1] = sine;
rotateZMatrix.matrix[1][0] = -sine;

return rotateZMatrix;
}

But notice that the direct rotation via Euler angles on any objects/models will cause Gimbal Lock. Gimbal lock is the loss of one degree of freedom in a three-dimensional, three-gimbal mechanism that occurs when the axes of two of the three gimbals are driven into a parallel configuration, “locking” the system into rotation in a degenerate two-dimensional space.
The word lock is misleading: no gimbal is restrained. All three gimbals can still rotate freely about their respective axes of suspension. Nevertheless, because of the parallel orientation of two of the gimbals’ axes there is no gimbal available to accommodate rotation about one axis.

CG

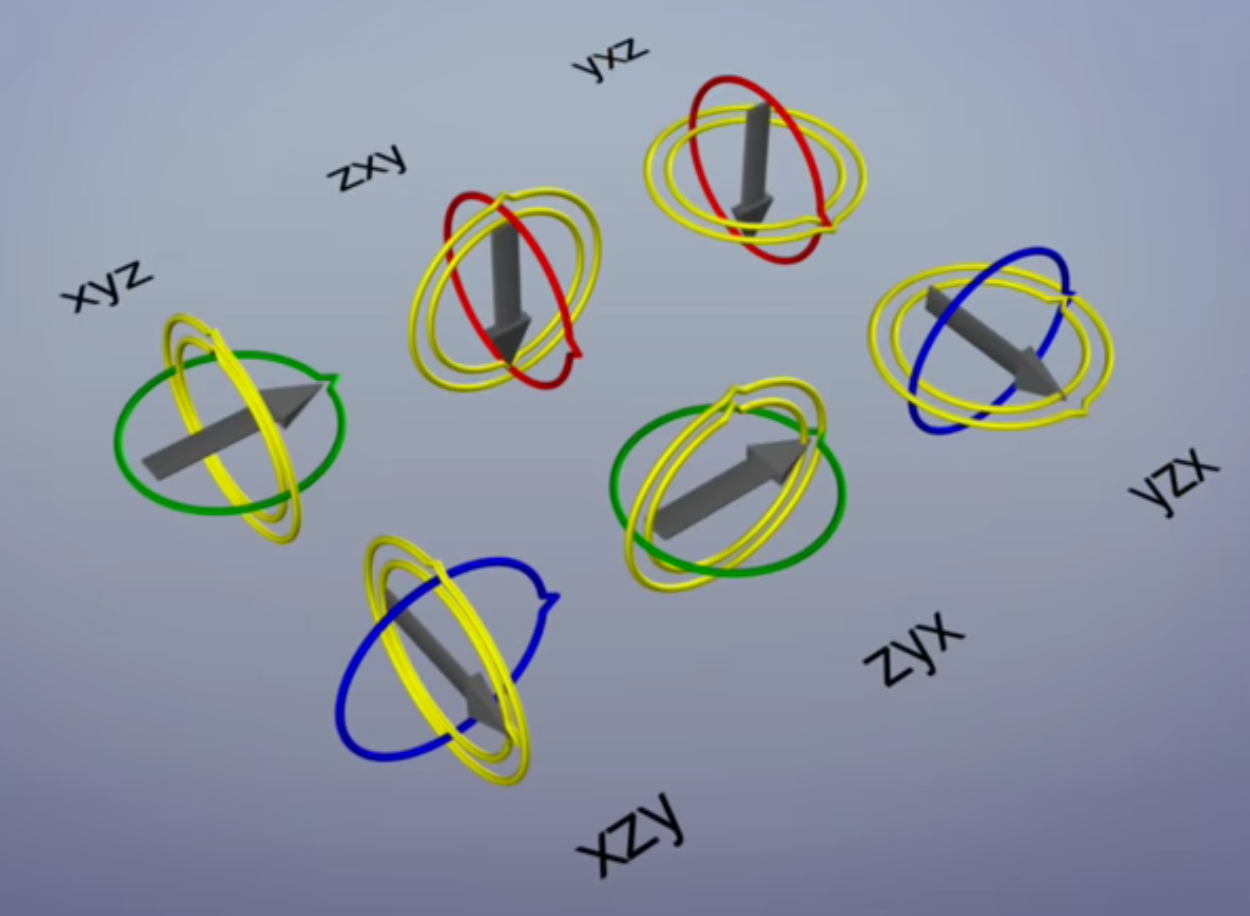
All together there are 6 parenting combinations to choose from. In each case gimbal lock occurs on the parent when the middle axis is rotated too far.

The cause of gimbal lock is the representation of orientation in calculations as three axial rotations based on Euler angles. A potential solution therefore is to represent the orientation in some other way. This could be as a rotation matrix, a quaternion , or a similar orientation representation that treats the orientation as a value rather than three separate and related values. Given such a representation, the user stores the orientation as a value. To quantify angular changes produced by a transformation, the orientation change is expressed as a delta angle/axis rotation. The resulting orientation must be re-normalized to prevent the accumulation of floating-point error in successive transformations. For matrices, re-normalizing the result requires converting the matrix into its nearest orthonormal representation. For quaternions, re-normalization requires performing quaternion normalization.

To avoid gimbal lock, we can use quaternion. Quaternion is a complex system in math.
In mathematics, the quaternion number system extends the complex numbers. Quaternions were first applied to mechanics in three-dimensional space. Hamilton defined a quaternion as the quotient of two directed lines in a three-dimensional space, or, equivalently, as the quotient of two vectors. Multiplication of quaternions is noncommunicative. Quaternions are used in pure mathematics, but also have practical uses in applied mathematics, particularly for calculations involving three-dimensional rotations, such as in three-dimensional computer graphics, computer vision, and crystallographic texture analysis. They can be used alongside other methods of rotation, such as Euler angles and rotation matrices, or as an alternative to them, depending on the application. It can avoid Gimbal Lock.

The detail of an angle’s quaternion is a matrix shown below:
Quaternion matrix to describe the rotation

1
2
3
4
5
6
7
8
9
10
StartPoint(x1, y1, z1, 1)
EndPoint(x1, y1, z1, 1)
EulerAngle<StartPoint, EndPoint> = θ
Quaternion
= (
(StartPoint ⊗ EndPoint).x,
(StartPoint ⊗ EndPoint).y,
(StartPoint ⊗ EndPoint).z,
(StartPoint • EndPoint), // ==> cos(θ / 2)
)

The Euler angle between start point and the end point: θ, can be inversely calculated out through a quaternion for test, and it is equal to 2*arccos(Quaternion.w) when being inverted.

Here is the detailed method to get quaternion in real code:

1
2
3
4
5
6
7
8
9
10
11
12
13
14
15
16
17
18
19
20
21
22
23
24
25
26
27
28
29
30
31
Vector4 GetQuaternion(const Vector2 & lastPointV2, const Vector2 & curPointV2)
{
Vector4 result;

Vector3 lastPointV3;
Vector3 curPointV3;
ArcBallTransform(lastPointV2, lastPointV3);
ArcBallTransform(curPointV2, curPointV3);

Vector3 perp;
perp = lastPointV3 ^ curPointV3;

if (perp.getLength() > EPSILON)
{
result.setX(perp.getX());
result.setY(perp.getY());
result.setZ(perp.getZ());
// w=cos(rotationAngle/2) ---> formula
result.setW(lastPointV3 * curPointV3);
}
else
{
result.setX(.0f);
result.setY(.0f);
result.setZ(.0f);
result.setW(.0f);
}

///std::cout << "rotated (in degree)" << RadToDegree(2 * acosf(result.getW())) << std::endl;
return result;
}

You can see that the function above includes a function called ArcBallTransform, which is a mathematical way to map the 2D point onto a 3D sphere, thus making it possible to describe the user's interaction from 2D screen to 3D virtual world space. The detail of the arc ball transform goes like the code shown below:

1
2
3
4
5
6
7
8
9
10
11
12
13
14
15
16
17
18
19
20
21
22
23
24
25
26
27
28
29
30
31
32
33
34
35
36
37
38
39
40
41
42
43
44
   float GetKFactorForArcBall(const float para)
{
// mouse point ranges from [0, window_width - 1]
return 1.f / ((para - 1.f) * 0.5f);
}

void ArcBallTransform(const Vector2& pointOnScreen, Vector3& pointOnSphere)
{
// convert width&height to [-1,1], left-hand coordinate
Vector2 tempVec2((pointOnScreen.getX() * GetKFactorForArcBall(WINDOW_WIDTH)) - 1.f, (pointOnScreen.getY() * GetKFactorForArcBall(WINDOW_HEIGHT)) - 1.f);
//Vector2 tempVec2((pointOnScreen.getX() * GetKFactorForArcBall(WINDOW_WIDTH)) - 1.f,1.f - (pointOnScreen.getY() * GetKFactorForArcBall(WINDOW_HEIGHT))); // left-hand coordinate
float length = pow(tempVec2.getX(), 2) + pow(tempVec2.getY(), 2);

// if it's outside the ball
if (length > 1.f)
{
// scale to sphere
float norm = -1.f / sqrtf(length);

pointOnSphere.setX(tempVec2.getX() * norm);
pointOnSphere.setY(tempVec2.getY() * norm);
pointOnSphere.setZ(0.f);
}
// if it's inside the ball
else
{
pointOnSphere.setX(tempVec2.getX());
pointOnSphere.setY(tempVec2.getY());
pointOnSphere.setZ(sqrtf(1.f - length));
}
}

float GetArcAngleCosineValue(const Vector3& position, const Vector3& startPosition, const Vector3& endPosition)
{
float r = position.getZ();
float pointDistance =
sqrtf(
pow((endPosition.getX() - startPosition.getX()), 2)
+ pow((endPosition.getY() - startPosition.getY()), 2)
+ pow((endPosition.getZ() - startPosition.getZ()), 2));
float consAngle = (pow(r, 2) + pow(r, 2) - pow(pointDistance, 2)) / (2 * r * r); // cosine formula
return consAngle;
}

Changing the location(Translating the objects/models) directly from the screen-side(eg: the user clicked to select an object and moved the mouse from one point on screen to the other just to make the selected object move as the mouse’s track) is also in the same way I have mentioned above, but is much easier than doing rotation via arc ball transform plus quaternion. Only the subtraction of the 2 points is needed without any complicated calculations. However, the selection of the object/model in virtual 3D world space from 2D screen is a little bit hard for most of the fresh-hands for it demands some more bounding-box related algorithms and knowledge basis to achieve this.

Now here is the details of the translation transform matrix, through which we are able to translate an object from one place to another in a 3D world space:

1
2
3
4
5
6
TranslationMatrix = {
{1, 0, 0, 0}
{0, 1, 0, 0}
{0, 0, 1, 0}
{x, y, z, 1}
};

And here is the way to get the translation matrix in C++:

1
2
3
4
5
6
7
8
9
10
11
12
13
14
15
Matrix4f Matrix4f::getTranslateMatrix(const float& x, const float& y, const float& z)
{
Matrix4f translationMatrix;

translationMatrix.matrix[0][0] = 1.0f;
translationMatrix.matrix[1][1] = 1.0f;
translationMatrix.matrix[2][2] = 1.0f;
translationMatrix.matrix[3][3] = 1.0f;

translationMatrix.matrix[3][0] = x;
translationMatrix.matrix[3][1] = y;
translationMatrix.matrix[3][2] = z;

return translationMatrix;
}

After the translation, we might need some ways to scale the models/objects in 3D world space so that the things can be in the size we expected. Here is the detail of the scale matrix:

1
2
3
4
5
6
ScaleMatrix = {
{x, 0, 0, 0}
{0, y, 0, 0}
{0, 0, z, 0}
{0, 0, 0, 1}
};

Here are 2 ways to get the scale matrix in C++:

1
2
3
4
5
6
7
8
9
10
11
12
13
14
15
16
17
18
19
20
21
22
23
Matrix4f Matrix4f::getScaleMatrix(const float& x, const float& y, const float& z)
{
Matrix4f scaleMatrix;

scaleMatrix.matrix[0][0] = x;
scaleMatrix.matrix[1][1] = y;
scaleMatrix.matrix[2][2] = z;
scaleMatrix.matrix[3][3] = 1.0f;

return scaleMatrix;
}

Matrix4f Matrix4f::getScaleMatrix(const Matrix4f & matrixToScale, const float scaleFactor)
{
Matrix4f result;

for (int i = 0; i < 4; i++) {
for (int j = 0; j < 4; j++)
result.matrix[i][j] = matrixToScale.matrix[i][j] * scaleFactor;
}

return result;
}

All the transforms in world space from either the user interaction or the preset automation is conducted through matrices. The vertices multiplies the world space matrix, translation matrix, scale matrix as well as rotation matrix, the order of multiplying with the scale matrix, translation matrix and rotation matrix can be various be they should always be on the right side of the multiplication when using the ‘vector • matrix’(vector-on-the-right-side) rule. Otherwise, the transpose of them is needed to carry out the transformations correctly.

The formula goes like this:

1
ModelInWorldSpaceAfterScaling = ModelInWorldSpace * ScaleMatrix
1
ModelInWorldSpaceAfterRotation = ModelInWorldSpace * RotationMatrix
1
ModelInWorldSpaceAfterTranslation = ModelInWorldSpace * TranslationMatrix
1
ModelInWorldSpaceAfterTransform = ModelInWorldSpace * ScaleMatrix * RotationMatrix * TranslationMatrix

The second step is to transform the model from the world space into the view space. In order to create a view space, we have to construct a camera first. The main functions of this camera is to shot the models in scene and send the rendering data onto screen so that we can see what’s happening in the virtual 3D world. You can either separate the camera out as a single class or just inject it into the one of the class you think injectable and appropriate.

Before constructing a camera, we should learn the main function that the camera has to do for us while rendering. To make it more specific, the camera can be regarded as our eyes in the virtual 3D world, and in this way you’re going to realize the first thing the camera have to solve: seeing the models. How to see those models in the scene? There should be some rules so that the view is in correct and non-distorted state. Here are some rules we have to consider:

  1. The up-axis of the camera [In order to view the models/objects correctly];
  2. The position we are viewing the models from [We have to keep a distance from the models we want to see so that we can see them];
  3. The target of the camera that is shooting [In oder to specify the shooting position];

These three aspects are crucial for a camera to shoot the models or objects in a 3D space correctly, so we are going to build up a way to describe the way a camera shoots the scene. In computer graphics, we still use a matrix to describe the way, but there are 2 types of rule that the one is in left-hand coordinate while the other is in right-hand coordinate. Just use the one that you will not change in the future. In this book I use the left hand coordinate system in building up my camera matrix, which is called “LookAtMatrix” formally in the project. Let’s just take a look at the details of the view matrix we are going to use:

1
2
3
4
5
6
7
8
9
10
11
12
13
14
15
16
17
18
19
20
21
22
23
24
25
26
27
28
29
30
31
32
33
34
35
36
37
38
Matrix4f getLookAtMatrixForLeftHandCoordinate(Vector3 * eyePos, const Vector3 * lookAt, const Vector3 * up, Vector3 & newCameraUpAxis)
{
Vector3 zAxis = *lookAt - *eyePos;
zAxis.Normalize();
Vector3 xAxis = *up ^ zAxis; // cross product
xAxis.Normalize();
Vector3 yAxis = zAxis ^ xAxis; // cross product
newCameraUpAxis = yAxis; // store the last up-axis for updating camera position

Matrix4f result;

/// when(major==raw) => do: below
result.matrix[0][0] = xAxis.getX();
result.matrix[0][1] = yAxis.getX();
result.matrix[0][2] = zAxis.getX();
result.matrix[0][3] = 0;
result.matrix[1][0] = xAxis.getY();
result.matrix[1][1] = yAxis.getY();
result.matrix[1][2] = zAxis.getY();
result.matrix[1][3] = 0;
result.matrix[2][0] = xAxis.getZ();
result.matrix[2][1] = yAxis.getZ();
result.matrix[2][2] = zAxis.getZ();
result.matrix[2][3] = 0;
result.matrix[3][0] = -(xAxis * (*eyePos));
result.matrix[3][1] = -(yAxis * (*eyePos));
result.matrix[3][2] = -(zAxis * (*eyePos));
result.matrix[3][3] = 1;

/*
Matrix-Structure(
xaxis.x, yaxis.x, zaxis.x, 0,
xaxis.y, yaxis.y, zaxis.y, 0,
xaxis.z, yaxis.z, zaxis.z, 0,
-xaxis.Dot(eyePos), -yaxis.Dot(eyePos), -zaxis.Dot(eyePos), 1
);*/
return result;
}

It’s just creating a virtual camera for shooting the virtual 3D world using matrix. Ones all the significant information is stored in the matrices, it will be so easy for us to apply them onto the models in the 3D world be rendered. The result of the matrix we gain via the function above is the origin of our view matrix. So we apply the matrix we gain by using the function above to an empty matrix to store our view matrix. Now you will realize that you can directly regard the view matrix as the ‘camera matrix’ or ‘eye matrix’, any transforms conducted onto the camera shall directly be conducted on the view matrix.

Now that we gained the view matrix singly by configuring the camera we are using in the virtual 3D world, we can transform the vertices from the world space into the view space just by updating the vertices in the world space through: multiplying the vertex positions already in the world space with the view matrix.

1
ModelInViewSpace = ModelInWorldSpace * ViewMatrix;

Till now, we have successfully transformed the models from the world space into the view space, next step after this is the transform of the model from the view space into the projection space. In order to make the transform, we have to gain projection matrix first.

There are 2 kinds of projections in our life, the one is orthographic while the other is perspective.

In the orthographic projection, the things we see will be shown in the shape based on its original geometric shape, non-distorted surfaces with all of the lines and points mathematically-ordered. For this reason, we use a cube to project the objects/models in the view space, all the shapes are projected mathematically through a cube.

In the perspective projection, the things we see will be shown in the shape based on its realistic shape we see in our real life. It seems ‘realistic’ just because of the fact that the human eyes see things in perspective view, the shapes of the objects in real life is distorted when it is being projected into our brains from our eyes: mastering the rule that “Everything looks small in the distance and big on the contrary”. For this reason, we use cone to project the objects/models in the view space rather than a cube, all the shapes are projected from a point, also, the furthest objects will disappear and become as a point after the projection.

Since we have noticed the main difference of 2 types of projection, the question lingers: What elements are needed when acquiring the projection matrix?

As we use a geometry to make the projection process(using a cube to make the orthographic projection while using a cone to make the perspective projection), the properties of the geometry selected shall be the attributes we have to consider when making the projection. We store the projection space in a 4x4 matrix as we did for the world space and view space before.

A cube has its width, height and length. When projecting, it’s enough for us to build out an orthographic projection matrix using these 3 attributes. We use its length to represent the distance from the nearest z-position(zNear) to the furthest z-position(zFar). Any objects/models outside this range will not be seen and should be clipped away so that they will not be rendered on screen. We usually set a small number, for example 0.2 as the nearest z-position while a bigger like 500 as the furthest z-position. Conus left can be 0 while the conus right should be the width of the cube, conus bottom can be 0 while the conus top should be the height of the cube. Here is the details of the orthographic matrix:

1
2
3
4
5
6
7
8
9
10
11
12
13
14
Matrix4f Matrix4f::getOrthographicMatrix(const float conusLeft, const float conusRight, const float conusBottom, const float conusTop, float zNear, float zFar)
{
Matrix4f orthographicMatrix;
/// make z range : [0,1], left hand coordinate
orthographicMatrix.matrix[0][0] = 2.f / (conusRight - conusLeft);
orthographicMatrix.matrix[1][1] = 2.f / (conusTop - conusBottom);
orthographicMatrix.matrix[2][2] = 1.f / (zFar - zNear); // in left hand coordinate
orthographicMatrix.matrix[3][0] = -(conusRight + conusLeft) / (conusRight - conusLeft);
orthographicMatrix.matrix[3][1] = -(conusTop + conusBottom) / (conusTop - conusBottom);
orthographicMatrix.matrix[3][2] = -zNear / (zFar - zNear);
orthographicMatrix.matrix[3][3] = 1.f;

return orthographicMatrix;
}

A cone, however, is different from a cube, and it has not width or height. Apart form using its length to represent the distance from the nearest z-position(zNear) to the furthest z-position(zFar), we use its angle on roof to represent the viewing field, which is formally called: field of view. And there is another element we have to consider when building the perspective matrix, that is: aspect ratio, which is the ratio of the rendering view’s(or the image’s) width to its height, and is expressed with 2 numbers separated by a colon, such as 16:9. Its simple to gain the aspect ratio once we configured the target rendering height and width. In the final project accompanied with this book, I used 720 as window width and 576 as window height, which means the aspect ratio is 720:576. By now, we have all the important information gained from a cone to build out a perspective projection matrix, which represents the perspective projection space itself. Let’s take a look at the details of the perspective matrix below:

1
2
3
4
5
6
7
8
9
10
11
12
13
14
15
16
Matrix4f Matrix4f::getPerspectiveMatrix(float fovYOZ, float aspectRatio, float zNear, float zFar)
{
fovYOZ = DegreeToRad(fovYOZ);

float focalLength = 1.f / tanf(fovYOZ / 2);

Matrix4f perspectiveMatrix;

perspectiveMatrix.matrix[0][0] = focalLength / aspectRatio;
perspectiveMatrix.matrix[1][1] = focalLength;
perspectiveMatrix.matrix[2][2] = zFar / (zFar - zNear); // in left hand coordinate
perspectiveMatrix.matrix[3][2] = -(zFar * zNear) / (zFar - zNear);
perspectiveMatrix.matrix[2][3] = 1.f; // in left hand coordinate

return perspectiveMatrix;
}

Then the way to transform the vertices from the view space into the projection space is as easy as what we have done when transforming the vertices form the world space into the view space: multiplying the model information matrix in view space with one of the projection matrix we calculated above. The formula goes like this:

1
ModelInProjectionSpace = ModelInViewSpace * ProjectionMatrix;

Notice that we should choose one type of projection at a time so that we can view in relevant projection mode, so the exact formula in a frame goes like this:
When using perspective mode

1
ModelInPerspectiveProjectionSpace = ModelInViewSpace * PerspectiveProjectionMatrix;

When using orthographic mode

1
ModelInOrthographicProjectionSpace = ModelInViewSpace * OrthographicProjectionMatrix;

Till now we have successfully processed the MVP transform, here is the recitation of the MVP transform in a nut shell:

(matrices are all with type:matrix4f)
(positions are all with type:vector4)

1
ModelInWorldSpace = ModelVertices[n].position * WorldMatrix;
1
ModelInViewSpace = ModelInWorldSpace * ViewMatrix;
1
ModelInProjectionSpace = ModelInViewSpace * ProjectionMatrix;

After we have transformed the vertices into the relevant projection space(perspective or orthographic), we have to make clippings. Clipping is a way to ignore the vertices that need not to be rendered in our visible area. In formula, when a vertex is inside the frustum, its position in X-axis and Y-axis will lay among the range of [-w, w] while its position in Z-axis will be in the range of [0, w]. So we can use this formula to check whether a vertex is inside the frustum. Here is the detail of the way to check whether a vertex is inside the CVV:

1
2
3
4
5
6
7
8
9
10
11
12
   bool IsOutsideCVV(const Vector4& v)
{
float x = v.getX();
float y = v.getY();
float z = v.getZ();
float w = v.getW();

if (x <= w && x >= -w && y <= w && y >= -w && z <= w && z >= 0)
return false;

return true;
}

A similar step with clippings is back culling, which is a way to ignore the back side of the model being rendered so that the rendering efficiency may be accelerated. When culling the backside of the model being rendered in virtual 3D world space, the important thing is to figure out its normal. The normal is decided upon the rule of drawing triangle: if you draw a triangle by connecting the vertices clockwise, the back side of the model is pointed to the inner side to the screen, vice versa. We can easily figure out the normal based on the Right-hand Screw Rule, but in programming, we have to know the way to express the Right-hand Screw Rule: we make subtractions twice to take all the three points into consideration as well as pretending to screw from one point to the other, then we calculate the cross product of the first point with the second point(or the second with the third, as is shown using ‘way 2’ below, but the points must be in continuity so as to pretend the screwing correctly). This normalized cross-product result best describes the normal of three points — the triangle. The back side of a primitive is easily figured out in this way. Here is the detail of CVV-Clipping and back-culling in my simple project:

1
2
3
4
5
6
7
8
9
10
11
12
13
14
15
16
17
18
19
20
21
22
23
24
25
26
27
28
29
30
31
32
33
34
35
36
37
38
39
40
41
42
43
44
45
46
47
48
49
50
51
52
53
54
55
56
57
58
59
60
61
62
63
64
65
66
67
68
69
70

Vector4 GetNormalVectorForBackCulling(const Vector4& p1, const Vector4& p2, const Vector4& p3)
{
Vector4 s1, s2, pn;
s1 = p3 - p2;
s2 = p2 - p1;
pn = s1 ^ s2; //way 1
//Vector4 s3; s3 = p1 - p3; pn = s2 ^ s3; //way 2
pn.Normalize();
return pn;
}


bool ShouldCullBack(const Vector4& vec)
{
// anti-clock wise culling
Vector4 v(0.f, 0.f, 1.f, 0.f);
if (v * vec > 0) return false;
return true;
}

void DrawTriangle(Vertex& v1, Vertex& v2, Vertex& v3, const Colour** texture)
{
Vector4 pos1AfterMVP, pos2AfterMVP, pos3AfterMVP;

Vector4 pos1TransformedToWorld, pos2TransformedToWorld, pos3TransformedToWorld;
m_transform->ModelToWorld(pos1TransformedToWorld, v1.pos);
m_transform->ModelToWorld(pos2TransformedToWorld, v2.pos);
m_transform->ModelToWorld(pos3TransformedToWorld, v3.pos);

v1.posInWorldSpace = pos1TransformedToWorld;
v2.posInWorldSpace = pos2TransformedToWorld;
v3.posInWorldSpace = pos3TransformedToWorld;

Vector4 pos1InView, pos2InView, pos3InView;
Vector4DotMatrix4f(pos1InView, pos1TransformedToWorld, m_transform->viewMatrix);
Vector4DotMatrix4f(pos2InView, pos2TransformedToWorld, m_transform->viewMatrix);
Vector4DotMatrix4f(pos3InView, pos3TransformedToWorld, m_transform->viewMatrix);

Vector4DotMatrix4f(pos1AfterMVP, pos1InView, m_transform->projectionMatrix);
Vector4DotMatrix4f(pos2AfterMVP, pos2InView, m_transform->projectionMatrix);
Vector4DotMatrix4f(pos3AfterMVP, pos3InView, m_transform->projectionMatrix);


Vector4 transformedVertNormal1, transformedVertNormal2, transformedVertNormal3;

// CVV Clip here
if (m_transform->IsOutsideCVV(pos1AfterMVP)
&& m_transform->IsOutsideCVV(pos2AfterMVP)
&& m_transform->IsOutsideCVV(pos3AfterMVP)) return; //The clipping happens here! Just stop here to prevent points from next steps.

m_transform->ModelToWorld(transformedVertNormal1, v1.normal);
m_transform->ModelToWorld(transformedVertNormal2, v2.normal);
m_transform->ModelToWorld(transformedVertNormal3, v3.normal);

Vector4 homogenizedVertPos1, homogenizedVertPos2, homogenizedVertPos3;
/// Set projection transform ---> To NDC
m_transform->Homogenize(homogenizedVertPos1, pos1AfterMVP);
m_transform->Homogenize(homogenizedVertPos2, pos2AfterMVP);
m_transform->Homogenize(homogenizedVertPos3, pos3AfterMVP);


Vector4 pn = GetNormalVectorForBackCulling(homogenizedVertPos1, homogenizedVertPos2, homogenizedVertPos3);
if (m_transform->ShouldCullBack(pn)) return; //The culling happens here! Just stop here to prevent the points from rasterization stage.


ScanLineDraw();
}


You can see that the points are just prevented from being sent to the rasterization stage when we are culling the back. The points are prevented from going to the next steps when clipping also.

There is a step not mentioned above that we may do before making the projection(inside the MVP, before ‘P’): shading lights. Shading lights is an operation conducted on textures of the models. When shading the light, lots of algorithms is used. In the final project asides this book, I showed the way of computing light and shading the light in Lambert mode. Main formula of Lambert Lighting is :

1
I = Ia * Ka + Ip * Kd * (N·L)
1
I = Ia * Ka + Ip * Kd * cosTheta;

The details of lighting are shown below:

1
2
3
4
5
6
7
8
9
10
11
12
13
14
15
16
17
18
19
20
21
22
23
24
25
26
27
28
29
30
31
32
33
34
35
36
37
38
39
40
41
42
43
44
45
46
47
48
49
50
51
52
53
54
55
56
57
58
59
60
61
62
63
64
65
66
67
68
69
70
71
72
73
74
75
76
77
78
79
struct Light
{
Vector3 direction;
Colour color;

Light(const Vector3& direction, const Colour& color) :direction(direction), color(color) {}
Light(const Colour& color) : color(color) {}
};

class DirectionalLight : public Light {
public:
// important to know that the initializer should be initiated from parent
DirectionalLight(const Colour& c, const Vector3& position, const Vector3& target, float intensity)
:Light(c), position(position), targetPosition(target), intensity(intensity) {}
DirectionalLight(const Colour& c, const Vector3& direction, float intensity)
:Light(Vector3::Normalize(direction), c), intensity(Clamp(intensity, 0.f, 1.f)) {}
~DirectionalLight() {}


// Global directional light using Lambert Shading
// I = Ia * Ka + Ip * Kd * (N·L)
// Ia * Ka --> ambient light
// back side will be totally black in the case of removing the ambient light
static void LambertLightOn(Colour& ambientColour, DirectionalLight* light, Vector3& normalInWorldSpace, Colour& vertexColor)
{
//float I, Ia, Ip, Kd, cosTheta;
float Ia, Ip, Kd, cosTheta;
Ia = 0.2f; //ambient light intensity
Ip = light->intensity; //directional light intensity
Kd = 1.f; //coefficients of directional light
light->direction.Normalize();
normalInWorldSpace.Normalize(); // must be normalized!!!
cosTheta = light->direction * normalInWorldSpace; // incident angel
cosTheta > 1.f ? (cosTheta = 1.f) : (cosTheta < 0.f ? cosTheta = 0.f : cosTheta = cosTheta);
////Formula: I = Ia * Ka + Ip * Kd * cosTheta;
Colour result = ambientColour * (Ia * Kd) + light->color * (Ip * Kd * cosTheta);
// clamp the colors' rgb value into valid range in case of bounding outside
if (result.r > 1.f || result.g > 1.f || result.b > 1.f)
result.r = result.g = result.b = 1.f;
else if (result.r < 0.f || result.g < 0.f || result.b < 0.f)
result.r = result.g = result.b = 0.f;
vertexColor = result;
}


void ComputeLighting(const DirectionalLight& light, const Vector3& P, const Vector3& N,
const Vector3& eyePosition, const float shininess,
Colour& diffuseResult, Colour& specularResult, const float attenuate)
{
// calculate diffuse
Vector3 L = (light.position - P);
L.Normalize();
float diffuseLight = max(N * L, 0); // always get the bigger value to ignore the error case such as shading from the back side
diffuseResult = light.color * diffuseLight * attenuate;

// calculate reflection
Vector3 V = eyePosition - P;
V.Normalize();
Vector3 H = L + V;
H.Normalize();
float specularLight = pow(max((N*H), 0), shininess);
if (diffuseLight <= 0) specularLight = 0;
specularResult = light.color * specularLight * attenuate;
}


private:
Vector3 targetPosition;
Vector3 position;
float intensity;

// calculate the normal vector of the light in world space coordinate
inline Vector3 DirectionInWorldSpace() {
Vector3 direction;
direction = position - targetPosition;
direction.Normalize();
return direction;
};
};

After the MVP transform and clippings, we know that the models state does not change at all, they are still in 3D state, but we have to see it on a 2D screen, so the screen mapping comes to help us transform the 3D vertices into the 2D screen. Screen mapping is a technic that maps the 3D vertices to the 2D screen. As is the codes shown above in function ‘DrawTriangle’, we simply call it Homogenize: the way to transform the vertices from the projection space into the screen space. Here is the detail of homogenizing a vertex:

1
2
3
4
5
6
7
8
9
10
11
   void Homogenize(Vector4& result, const Vector4& posInProjectionSpace)
{
if (posInProjectionSpace.W == 0) {
return Vector4();
}
float rhw = 1 / posInProjectionSpace.W;
result.X = (1 + posInProjectionSpace.X * rhw) * canvasWidth * 0.5; // screen coordinate
result.Y = (1 - posInProjectionSpace.Y * rhw) * canvasHeight * 0.5; //screen coordinate ---> top down
result.Z = posInProjectionSpace.Z * rhw;
result.W = rhw;
}

After such a long process, with the pixels we have just gain, we are entering into the next stage: rasterization stage, where we conduct multiple operations on each pixel so that each of the frame — namely an image, formed of many pixels — rendered on screen is in ideal state.


3. Rasterization Stage

The vertices we gain in screen space during the geometry stage will be used for drawing the final image, formally: single frame, that we are able to see directly.

After the screen mapping, through which we transformed the vertices from projection space to the screen space, some of the processes is still needed to make out a single frame to be rendered, and these processes are conducted in rasterization stage. Actually, it is the rasterization stage that converts vector information (composed of shapes or primitives) into a raster image (composed of pixels) for the purpose of displaying real-time 3D graphics.

During rasterization, each primitive is converted into pixels, while interpolating per-vertex values across each primitive. Rasterization includes clipping vertices to the view frustum, performing a divide by z to provide perspective, mapping primitives to a 2D viewport, and determining how to invoke the pixel shader. While using a pixel shader is optional, the rasterizer stage always performs clipping, a perspective divide to transform the points into homogeneous space, and maps the vertices to the viewport.

The positions[type:Vector4(x,y,z,w)] in each vertices, coming into the rasterizer stage are assumed to be in homogeneous clip-space. In this coordinate space the X axis points right, Y points up and Z points away from camera.

You may disable rasterization by telling the pipeline there is no pixel shader, and disabling depth and stencil testing. While disabled, rasterization-related pipeline counters will not update. There is also a complete description of the rasterization rules. Rasterization rules define how vector data is mapped into raster data. The raster data is snapped to integer locations that are then culled and clipped (to draw the minimum number of pixels), and per-pixel attributes are interpolated (from per-vertex attributes) before being passed to a pixel shader. There are several types of rules, which depend on the type of primitive that is being mapped, as well as whether or not the data uses multi-sampling to reduce aliasing. More related topics is available online and in this book we are just talking about the simple steps to create the usable pixels for rendering.

The vertices are placed in screen space after being clipped in projection space, but not formally, they are still in projection space de facto. Because we only clipped away the vertices outside the projected area, there are still vertices inside the projected area but outside the screen area. Different from the back culling, the vertices outside the screen area/space, which is also called: the view frustum, need to be clipped away not only for the reason that they are useless for rendering, but the consideration of those vertices may explode our frame buffer. Frame buffer is a container that stores all of the pixels going to be rendered on screen. Its volume is screenHeight*screenWidth large, so by now you will realize the importance of clipping of the vertices outside the screen space.

The RHW is the reciprocal of the homogeneous (clip space) w coordinate of a vertex (e.g., 1/w).
Recall that we must expand our 3D vectors to 4D vectors in order to be able to multiply them with 4x4 matrices (which we do because 4x4 matrices allow us to completely encode both rotational, translational, and scaling terms). In doing so we often set (or assume) the expanded fourth (w) component is 1 for model vertices, and the nature of the transforms we use to bring model-space vertices into world or view space doesn’t include any terms that alter the w component.
However, the typical perspective projection transformation often takes the follow general form which, when multiplied with a general view-space vertex vector (x,y,z,1), gives you a vector like (Ax, By, Cz + E, zD) — note that the resulting vertex has a w component that is proportional to the original input’s z component. Also note that the space you’re in after multiplication by this matrix is called clip space, because the nature of the transform has distorted the viewing frustum into a cuboid, the edges of which are much easier to perform clipping against.
After clipping, the graphics pipeline divided by the w component to scale things based on distance to give you the perspective effect. This division cannot be encoded in a matrix transform.
Now, division by w is the same as multiplication by the reciprocal of w, and the reason that you are required to give the reciprocal of the clip space w coordinate is probably a throwback to the time when division was significantly slower than multiplication. When you use pre-transformed vertices, the transformation from model to world to view to clip space is skipped, but the rest of the pipeline (division by w, conversion to window coordinates, and rasterization, obviously) must still happen. Since the projection transform was skipped, there is no basis for the pipeline to determine the w coordinate to divide by, so it asks you for it.

There are some interesting uses for the value, but for the most part people use pre-transformed vertices when doing 2D rendering, and in that case its most useful to set the RHW value to 1, which effectively causes the divide to be a no-op.

The detail of initiating the RHW is shown below:

1
2
3
4
5
6
7
8
9
void VertexRHWInit(Vertex& v)
{
v.rhw = 1 / v.pos.W;
v.tex.u *= v.rhw;
v.tex.v *= v.rhw;
v.normal.X = v.normal.X * v.rhw;
v.normal.Y = v.normal.Y * v.rhw;
v.normal.Z = v.normal.Z * v.rhw;
}

There are lots of ways to draw triangles when we have pixels in hand. Each of the way has its pros and cons and we have to choose the correct one to use. BUt in the final project, I provided multiple choices for learning. For example, you can use Point-by-Point Comparison Method to draw a line, it has its costs on performance but also has it advantage on some tiny models which ought to be rendered precisely. And, we can easily put some effects on each of the vertices when drawing the points. Here is the detail of the ‘Point-by-Point Comparison Method’:

1
2
3
4
5
6
7
8
9
10
11
12
13
14
15
16
17
18
19
20
21
22
23
24
25
26
27
28
29
30
31
32
33
34
35
36
37
38
39
40
41
42
43
44
45
46
47
48
49
50
51
52
   void DrawPoint(const Vector4& p, const Colour& color, const Texcoord& tc, const Vector3& normal)
{
int y = (int)p.getY();
int x = (int)p.getX();

if (y < 0 || y >= m_height) return;
if (x < 0 || x >= m_width) return;

float& z = m_zbuffer[y * m_width + x];

if (z < p.getZ()) return;

unsigned int fcolor = 0;

int s = GetState(m_state);

if (s & STATE_DRAW_COLOR)
{
fcolor = GetHEXColor(color);
}
else
{
Colour textureColor;
if (s & STATE_DRAW_TEX) {

if (m_interp == INTERP_NONE) {
int tx = (int)roundf((tc.u * (textureWidth - 1)));
int ty = (int)roundf((tc.v * (textureHeight - 1)));
textureColor = pixelColorData[ty][tx];
}
else
{
textureColor = BilinearInterp(pixelColorData, textureWidth, textureHeight, tc.u, tc.v);
}
}

// default ambient light
Colour ambient(0.f, 1.f, 1.f);
float ambientIntensity = AMBIENT_INTENSITY;

// influence of ambient
ambient.r *= ambientIntensity * textureColor.r;
ambient.g *= ambientIntensity * textureColor.g;
ambient.b *= ambientIntensity * textureColor.b;

//fcolor = (int(ambient.r * 255) << 16 | int(ambient.g * 255) << 8 | int(ambient.b * 255));
fcolor = GetHEXColor(Colour(ambient.r, ambient.g, ambient.b)); // simple functions of the code above
}

m_framebuffer[y][x] = fcolor;
z = p.getZ();
}

Here is the detail of the ‘Point-by-Point Comparison Method To Draw A Line’:

1
2
3
4
5
6
7
8
9
10
11
12
13
14
15
16
17
18
19
20
21
22
23
24
25
26
27
28
29
30
31
32
33
34
35
36
37
38
39
40
41
42
43
44
45
46
47
48
49
50
51
52
53
54
55
56
57
58
59
60
61
62
63

// Draw line via Point-by-Point Comparison Method
void DrawLine(const Vector4& p1, const Vector4& p2)
{
Colour color = GetColorFromHEX(m_foregroundColour);

Texcoord tex = { 0.f, 0.f };
Vector3 normal(0.f, 0.f, 0.f);

int x1, y1, x2, y2;
x1 = (int)p1.getX();
y1 = (int)p1.getY();
x2 = (int)p2.getX();
y2 = (int)p2.getY();

float y, x;
y = p1.getY();
x = p1.getX();

if (x1 == x2 && y1 == y2) {
DrawPoint(p1, color, tex, normal);
}
else if (x1 == x2) {
DrawPoint(p1, color, tex, normal);
int increment = (y1 < y2) ? 1 : -1;
while (1) {
y += increment;
if (increment == 1 && y >= y2) break;
if (increment == -1 && y <= y2) break;
Vector4 p(x, y, 0.f, 1.f);
DrawPoint(p, color, tex, normal);
}
DrawPoint(p2, color, tex, normal);
}
else if (y1 == y2) {
DrawPoint(p1, color, tex, normal);
int increment = (x1 < x2) ? 1 : -1;
while (1) {
x += increment;
if (increment == 1 && x >= x2) break;
if (increment == -1 && x <= x2) break;
Vector4 p(x, y, 0.f, 1.f);
DrawPoint(p, color, tex, normal);
}
DrawPoint(p2, color, tex, normal);
}
else {
DrawPoint(p1, color, tex, normal);
float t = (float)abs(x2 - x1) / abs(y2 - y1);
int xIncrement = (p1.getX() < p2.getX()) ? 1 : -1;
int yIncrement = (p1.getY() < p2.getY()) ? 1 : -1;
while (1) {
y += yIncrement;
if (yIncrement == 1 && y >= y2) break;
if (yIncrement == -1 && y <= y2) break;
x += t * xIncrement;
Vector4 p(x, y, 0.f, 1.f);
DrawPoint(p, color, tex, normal);
}
DrawPoint(p2, color, tex, normal);
}
}

You can also choose another ways to draw line. In the final project, I separated the conduction on the pixel in the way below:

1
2
3
4
5
6
7
8
9
10
11
12
13
14
15
16
17
18
19
20
21
22
23
24
25
26
27
28
29
30
   void DrawPixel(int x, int y, unsigned int hexColor)
{
if ((x < m_width) && ((y < m_height)) && ((x >= 0)) && ((y >= 0)))
{
m_framebuffer[y][x] = hexColor;
}
}

void DrawPixel(const Vector2 & point, unsigned int hexColor)
{
int x = (int)point.getX();
int y = (int)point.getY();
DrawPixel(x, y, hexColor);
}

void DrawPixel(int x, int y, const Colour & color)
{
if ((x < m_width) && ((y < m_height))
&& ((x >= 0)) && ((y >= 0)))
{
m_framebuffer[y][x] = GetHEXColor(color);
}
}

void DrawPixel(const Vector2 & point, const Colour & color)
{
int x = (int)point.getX();
int y = (int)point.getY();
DrawPixel(x, y, color);
}

Besides this way, you can use Bresenhem Way to draw the line, here are the details:

1
2
3
4
5
6
7
8
9
10
11
12
13
14
15
16
17
18
19
20
21
22
23
24
25
26
27
28
29
30
31
32
33
34
35
36
37
38
39
40
41
42
43
44
45
46
   void DrawBresenhemLine(const Vector4 & startPoint, const Vector4 & endPoint)
{
if (startPoint == endPoint) return;

int x0 = (int)startPoint.getX();
int y0 = (int)startPoint.getY();
int x1 = (int)endPoint.getX();
int y1 = (int)endPoint.getY();

bool steep = false;
if (std::abs(x0 - x1) < std::abs(y0 - y1))
{
std::swap(x0, y0);
std::swap(x1, y1);
steep = true;
}
if (x0 > x1)
{
std::swap(x0, x1);
std::swap(y0, y1);
}
int dx = x1 - x0;
int dy = y1 - y0;
int derror2 = std::abs(dy) * 2;
int error2 = 0;
int y = y0;
for (int x = x0; x <= x1; ++x) {
if (steep) {
Colour co(1.f, 1.f, 1.f);
//DrawPixel(y, x, GetColorIntensity(co)); // way 1
Vector4 p((float)y, (float)x, 0.f, 0.f);
DrawPoint(p, co); // way 2
}
else {
Colour co(1.f, 1.f, 1.f);
//DrawPixel(x, y, GetColorIntensity(co)); // way 1
Vector4 p((float)x, (float)y, 0.f, 0.f);
DrawPoint(p, co); // way 2
}
error2 += derror2;
if (error2 > dx) {
y += (y1 > y0 ? 1 : -1);
error2 -= dx * 2;
}
}
}

The way to draw line in Bresenhem way shown above can even be optimized to the codes below:

1
2
3
4
5
6
7
8
9
10
11
12
13
14
15
16
17
18
19
20
21
22
23
24
25
26
27
28
29
30
31
32
33
34
35
36
37
38
39
40
41
42
43
44
45
46
47
48
49
50
51
52
53
54
55
56
57
58
59
60
61
62
63
64
65
66
67
68
69
70
71
72
73
74
75
76
77
78
79
80
81
82
83
84
85
86
87
88
89
90
91
92
93
94
95
96
97
98
99
100
101
102
103
104
105
106
107
108
109
110
111
112
113

void DrawBresenhemLineInUnoptimizedWay(const Vector4 & startPoint, const Vector4 & endPoint)
{
if (startPoint == endPoint) return;

float x1 = startPoint.getX();
float y1 = startPoint.getY();
float x2 = endPoint.getX();
float y2 = endPoint.getY();

float xTemp, yTemp;


/*1:Draw the line segment with no slope.*/

if (x1 == x2)
{
// avoid oversteping the boundary of visual plane
if (x1 > m_width || x1 < 0) return;

if (y1 > y2)
{
yTemp = y1;
y1 = y2;
y2 = yTemp;
}
for (float y = y1; y < y2&&y < m_height&& y >= 0; ++y)
{
DrawPixel(Vector2(x1, y), Colour(1.f, 1.f, 1.f));
}
return;
}


/*2:Draw the line segment with no slope.*/

// stipulate X1<X2, otherwise, swap them
if (x1 > x2)
{
xTemp = x1;
x1 = x2;
x2 = xTemp;

yTemp = y1;
y1 = y2;
y2 = yTemp;
}

float k = (y2 - y1) / (x2 - x1);

// 1:as the gradient factor is less than 1 or bigger than 0
if (k >= 0.0f&&k <= 1.f)
{
// draw pixel crosswise from x1 to x2 with attention of limiting inside window width
for (float x = x1, y = y1; x <= x2 && x >= 0 && x < m_width; ++x)
{
float dis = (x - x1) * k + y1 - y;
if (dis >= 0.5)
{
++y;
}
DrawPixel(Vector2(x, y), Colour(1.f, 1.f, 1.f));
}
}

// 2:as the gradient factor is less than 0 or bigger than -1
else if (k < 0.0f&&k >= -1.f)
{
for (float x = x1, y = y1; x <= x2 && x >= 0 && x < m_width; ++x)
{
float dis = (x - x1)*k + y1 - y;
if (dis < -0.5)
{
--y;
}
DrawPixel(Vector2(x, y), Colour(1.f, 1.f, 1.f));
}
}

// 3:as the gradient factor is bigger than -1
else if (k > 1.f)
{
float k1 = 1.f / k;
for (float y = y1, x = x1; y <= y2 && y >= 0 && y < m_height; ++y)
{
float dis = (y - y1)*k1 + x1 - x;
if (dis >= 0.5)
{
++x;
}

DrawPixel(Vector2(x, y), Colour(1.f, 1.f, 1.f));
}
}

// 4:as the gradient factor is less than -1
else if (k < -1.f)
{
float k1 = 1.f / k;
for (float y = y2, x = x2; y <= y1 && y < m_height && y >= 0; ++y)
{
float dis = (y - y2)*k1 + x2 - x;
if (dis <= -0.5)
{
--x;
}

DrawPixel(Vector2(x, y), Colour(1.f, 1.f, 1.f));
}
}
}

Once we are able to draw lines, we are able to draw triangles, too. By calling the method of drawing lines three times can we build out a triangle we want:

1
2
3
4
   //           startPoint,            endPoint
DrawLine(homogenizedVertPos1, homogenizedVertPos2);
DrawLine(homogenizedVertPos1, homogenizedVertPos3);
DrawLine(homogenizedVertPos2, homogenizedVertPos3);

Apart from this, we can use Scan-line Way to rasterize triangles on screen, which is the core of our rendering. The detail of the scan-line way is shown below:

1
2
3
4
5
6
7
8
9
10
11
12
13
14
15
16
17
18
19
20
21
22
23
24
25
26
27
28
29
30
31
32
33
34
35
36
37
38
39
40
41
42
43
44
45
46
47
48
49
50
51
52
53
54
55
56
57
58
59
60
61
62
63
64
65
66
67
68
69
70
71
72
73
void ScanlineFill(const Vertex & leftPoint, const  Vertex & rightPoint, const int yIndex, const Colour** texture)
{
float lineWidth = rightPoint.pos.getX() - leftPoint.pos.getX();
float step = 1.f;
if (lineWidth > 0.f) step = 1.f / lineWidth;
else return;

for (float x = leftPoint.pos.getX(); x <= rightPoint.pos.getX(); x++)
{
int xIndex = (int)(x + 0.5f);
float lerpFactor = (x - leftPoint.pos.getX()) / lineWidth;
float zValue = Lerp(leftPoint.pos.getZ(), rightPoint.pos.getZ(), lerpFactor);
if (xIndex >= 0 && xIndex < m_width && zValue > 0.f && zValue < 1.f) // clip again
{
float rhwTemp = Lerp(leftPoint.rhw, rightPoint.rhw, lerpFactor);

float& zInBuffer = m_zbuffer[yIndex * m_width + xIndex];

if (zValue < zInBuffer)
{
// Perpective correction! ---> useless in orthographic mode
float w = 1.f / rhwTemp;

zInBuffer = zValue; // write into z-buffer

// uv interpolation to get the texture color (multiplies w to gain perspective correction of uv-texcture)
float u = Lerp(leftPoint.tex.u, rightPoint.tex.u, lerpFactor) * w * (textureWidth - 1);
float v = Lerp(leftPoint.tex.v, rightPoint.tex.v, lerpFactor) * w * (textureHeight - 1);

int uIndex = (int)(u + 0.5f); // maybe this is more effective than (int)roundf(fNum)
int vIndex = (int)(v + 0.5f);

Colour vertexColor(1.f, 1.f, 1.f);

if (uIndex <= textureWidth - 1 && uIndex >= 0
&& vIndex <= textureHeight - 1 && vIndex >= 0) {
if (mLightOn)
vertexColor = Lerp(leftPoint.color, rightPoint.color, lerpFactor);

Colour texColor;
if (m_interp == INTERP_BILINEAR) {
Colour** m_texture = (Colour**)texture;
texColor = BilinearInterp(m_texture, textureWidth, textureHeight, u, v);
}
else {
texColor = texture[uIndex][vIndex];
}

float xHere = Lerp(leftPoint.posInWorldSpace.getX(), rightPoint.posInWorldSpace.getX(), lerpFactor);
float yHere = Lerp(leftPoint.posInWorldSpace.getY(), rightPoint.posInWorldSpace.getY(), lerpFactor);
float zHere = Lerp(leftPoint.posInWorldSpace.getZ(), rightPoint.posInWorldSpace.getZ(), lerpFactor);
posInWorldSpace = Vector4(xHere, yHere, zHere, 1.f); // For showing shadow of the models on the floor

Vector4DotMatrix4f(lightScreenPosBeforsHomogenized, posInWorldSpace, lightSpaceMatrix);
m_transform->Homogenize(posInLightScreen, lightScreenPosBeforsHomogenized);

int hX = (int)(posInLightScreen.getX() + 0.5f);
int hY = (int)(posInLightScreen.getY() + 0.5f);

float bias = GetBiasDynamically(biasDelta, rightPoint.normal, leftPoint.normal, lerpFactor);

if (hX > 0 && hY > 0 && hX < m_width && hY < m_height) {
if (posInLightScreen.getZ() - bias > depthBufferFromLightPos[hY * m_width + hX])
texColor *= Colour(0.3f, 0.3f, 0.3f);
}

m_framebuffer[yIndex][xIndex] = GetHEXColor(vertexColor * texColor);
}
}
}
}
}

You can see that we conduct Bilinear Interpolcation in rasterization stage, its a way of avoiding the edges of the texture mapped on the models/pbjects. The details of ‘Bilinear Interpolcation’ is shown below:

1
2
3
4
5
6
7
8
9
10
11
12
13
14
15
16
17
18
19
20
21
22
23
24
25
26
27
28
29
30
31
32
33
34
35
36
37
38
39
40
41
42
43
44
45
46
47
48
49
50
51
52
53
Colour BilinearInterp(Colour** textureColorData, const int textureWidth, const int textureHeight, const float u, const float v)
{
//float y = u * textureHeight, x = v * textureWidth;
float y = v, x = u;

int x0 = (int)floorf(x);
int y0 = (int)floorf(y);
int x1 = x0 + 1, y1 = y0 + 1;

// border correction
if (x0 < 0) {
x0 = 0;
x1 = 1;
x = 0;
}
if (y0 < 0) {
y0 = 0;
y1 = 1;
y = 0;
}
if (x1 > textureWidth - 1) {
x1 = textureWidth - 1;
x0 = textureWidth - 2;
x = (float)textureWidth - 1;
}
if (y1 > textureHeight - 1) {
y1 = textureHeight - 1;
y0 = textureHeight - 2;
y = (float)textureHeight - 1;
}


float w00 = (float)((y1 - y) * (x1 - x));
float w01 = (float)((y1 - y) * (x - x0));
float w11 = (float)((y - y0) * (x - x0));
float w10 = (float)((y - y0) * (x1 - x));


Colour c00 = textureColorData[x0][y0];
Colour c01 = textureColorData[x1][y0];
Colour c10 = textureColorData[x0][y1];
Colour c11 = textureColorData[x1][y1];

Colour interpedResult00 = c00 * w00;
Colour interpedResult01 = c01 * w01;
Colour interpedResult10 = c10 * w10;
Colour interpedResult11 = c11 * w11;

Colour c = interpedResult00 + interpedResult01 + interpedResult10 + interpedResult11;

return c;
}


When rasterizing, notice that the lerping is also needed in screen space for acquiring a correct pixel position on screen. More details of Lerping and resterizing triangles are shown below:

1
2
3
4
5
6
7
8
9
10
11
12
13
14
15
16
17
18
19
20
21
22
23
24
25
26
27
28
29
30
31
32
33
34
35
36
37
38
39
40
41
42
43
44
45
46
47
48
49
50
51
52
53
54
55
56
57
58
59
60
61
62
63
64
65
66
67
68
69
70
71
72
73
74
75
76
77
78
79
80
81
82
83
84
85
86
87
88
89
90
91
92
93
94
95
96
97
98
99
100
101
102
103
104
105
106
107
108
109
110
111
112
113
114
115
116
117
118
119
120
121
122
123
124
125
126
127
128
129
130
131
132
133
134
135
136
137
138
139
140
141
142
143
144
145
146
147
148
149
150
151
152
153
154
155
156
157
158
159
160
161
162
163
164
165
166
167
168
169
170
171
172
173
174
175
176
177
178
179
180
181
182
183
184
185
186
187
188
189
190
191
192
193
194
195
196
197
198
199
200
201
202
203
204
205
206
207
208
209
210
211
212
213
214
215
216
217
218
219
220
221
222
223
224
225
226

float Lerp(const float a, const float b, const float t)
{
if (t <= 0.f) return a;
else if (t >= 1.f) return b;
else return (b - a) * t + a; // optimized
}


Vector4 Lerp(const Vector4 vecA, const Vector4 vecB, const float t)
{
Vector4 result(
Lerp(vecA.getX(), vecB.getX(), t),
Lerp(vecA.getY(), vecB.getY(), t),
Lerp(vecA.getZ(), vecB.getZ(), t),
Lerp(vecA.getW(), vecB.getW(), t)
);
return result;
}

Vertex Lerp(const Vertex vecA, const Vertex vecB, const float t)
{
Vertex result{
Lerp(vecA.pos, vecB.pos, t),
Lerp(vecA.color, vecB.color, t),
Lerp(vecA.tex.u, vecB.tex.u, t),
Lerp(vecA.tex.v, vecB.tex.v, t),
Lerp(vecA.normal, vecB.normal, t),
Lerp(vecA.rhw, vecB.rhw, t),
Lerp(vecA.posInWorldSpace, vecB.posInWorldSpace, t)
};
return result;
}

Colour Lerp(const Colour& a, const Colour& b, float t)
{
Colour result;
result.r = Lerp(a.r, b.r, t);
result.g = Lerp(a.g, b.g, t);
result.b = Lerp(a.b, b.b, t);
return result;
}

void LerpVertexInScreenSpace(Vertex & v, const Vertex & v1, const Vertex & v2, float t)
{
//optimized below ---> using the inline Lerp functions rather than the one from Math.h
v.rhw = Lerp(v1.rhw, v2.rhw, t);
v.tex.u = Lerp(v1.tex.u, v2.tex.u, t);
v.tex.v = Lerp(v1.tex.v, v2.tex.v, t);
v.color = Lerp(v1.color, v2.color, t);
v.pos = Lerp(v1.pos, v2.pos, t);
v.normal = Lerp(v1.normal, v2.normal, t); // comment this line to stay normal unchanged(in world space)
v.posInWorldSpace = Lerp(v1.posInWorldSpace, v2.posInWorldSpace, t);
}

void DrawTopTriangle(const Vertex & p1, const Vertex & p2, const Vertex & p3, const Colour** texture)
{
for (float y = p1.pos.getY(); y <= p3.pos.getY() && y >= 0 && y < m_height; y += 0.5f)
{
int yIndex = (int)roundf(y);
if (yIndex >= 0 && yIndex < m_height)
{
float xl = (y - p1.pos.getY()) * (p3.pos.getX() - p1.pos.getX()) / (p3.pos.getY() - p1.pos.getY()) + p1.pos.getX();
float x2 = (y - p2.pos.getY()) * (p3.pos.getX() - p2.pos.getX()) / (p3.pos.getY() - p2.pos.getY()) + p2.pos.getX();

float dy = y - p1.pos.getY();
float t = dy / (p3.pos.getY() - p1.pos.getY());

// get the right and left point via interpolation
Vertex new1;
new1.pos.setX(xl);
new1.pos.setY(y);
LerpVertexInScreenSpace(new1, p1, p3, t);

Vertex new2;
new2.pos.setX(x2);
new2.pos.setY(y);
LerpVertexInScreenSpace(new2, p2, p3, t);

if (new1.pos.getX() < new2.pos.getX())
{
ScanlineFill(new1, new2, yIndex, texture);
}
else
{
ScanlineFill(new2, new1, yIndex, texture);
}
}
}
}

void DrawBottomTriangle(const Vertex & p1, const Vertex & p2, const Vertex & p3, const Colour** texture)
{
for (float y = p1.pos.getY(); y <= p2.pos.getY() && y >= 0 && y < m_height; y += 0.5f)
{
int yIndex = (int)roundf(y);
if (yIndex >= 0 && yIndex < m_height)
{
float xl = (y - p1.pos.getY()) * (p2.pos.getX() - p1.pos.getX()) / (p2.pos.getY() - p1.pos.getY()) + p1.pos.getX();
float x2 = (y - p1.pos.getY()) * (p3.pos.getX() - p1.pos.getX()) / (p3.pos.getY() - p1.pos.getY()) + p1.pos.getX();

float dy = y - p1.pos.getY();
float t = dy / (p2.pos.getY() - p1.pos.getY());

// get the right and left point via interpolation
Vertex new1;
new1.pos.setX(xl);
new1.pos.setY(y);
LerpVertexInScreenSpace(new1, p1, p2, t);

Vertex new2;
new2.pos.setX(x2);
new2.pos.setY(y);
LerpVertexInScreenSpace(new2, p1, p3, t);

if (new1.pos.getX() < new2.pos.getX())
{
ScanlineFill(new1, new2, yIndex, texture);
}
else
{
ScanlineFill(new2, new1, yIndex, texture);
}
}
}
}

void TriangleRasterization(const Vertex & p1, const Vertex & p2, const Vertex & p3, const Colour** texture)
{
if (p1.pos.getY() == p2.pos.getY())
{
if (p1.pos.getY() < p3.pos.getY())
{// Flat top
DrawTopTriangle(p1, p2, p3, texture);
}
else
{// Flat bottom
DrawBottomTriangle(p3, p1, p2, texture);
}
}
else if (p1.pos.getY() == p3.pos.getY())
{
if (p1.pos.getY() < p2.pos.getY())
{// Flat top
DrawTopTriangle(p1, p3, p2, texture);
}
else
{// Flat bottom
DrawBottomTriangle(p2, p1, p3, texture);
}
}
else if (p2.pos.getY() == p3.pos.getY())
{
if (p2.pos.getY() < p1.pos.getY())
{// Flat top
DrawTopTriangle(p2, p3, p1, texture);
}
else
{// Flat bottom
DrawBottomTriangle(p1, p2, p3, texture);
}
}
else
{// Segment the triangle
Vertex top;

Vertex bottom;
Vertex middle;
if (p1.pos.getY() > p2.pos.getY() && p2.pos.getY() > p3.pos.getY())
{
top = p3;
middle = p2;
bottom = p1;
}
else if (p3.pos.getY() > p2.pos.getY() && p2.pos.getY() > p1.pos.getY())
{
top = p1;
middle = p2;
bottom = p3;
}
else if (p2.pos.getY() > p1.pos.getY() && p1.pos.getY() > p3.pos.getY())
{
top = p3;
middle = p1;
bottom = p2;
}
else if (p3.pos.getY() > p1.pos.getY() && p1.pos.getY() > p2.pos.getY())
{
top = p2;
middle = p1;
bottom = p3;
}
else if (p1.pos.getY() > p3.pos.getY() && p3.pos.getY() > p2.pos.getY())
{
top = p2;
middle = p3;
bottom = p1;
}
else if (p2.pos.getY() > p3.pos.getY() && p3.pos.getY() > p1.pos.getY())
{
top = p1;
middle = p3;
bottom = p2;
}
else
{
// 3 points colinear
return;
}

// get middle X by interpolation, get coeffiecient-t first
float middleX = (middle.pos.getY() - top.pos.getY()) * (bottom.pos.getX() - top.pos.getX()) / (bottom.pos.getY() - top.pos.getY()) + top.pos.getX();
float dy = middle.pos.getY() - top.pos.getY();
float t = dy / (bottom.pos.getY() - top.pos.getY());

// get the right and left point via interpolation
Vertex newMiddle;
newMiddle.pos.setX(middleX);
newMiddle.pos.setY(middle.pos.getY());
newMiddle.normal = middle.normal;
LerpVertexInScreenSpace(newMiddle, top, bottom, t);

DrawBottomTriangle(top, newMiddle, middle, texture);
DrawTopTriangle(newMiddle, middle, bottom, texture);
}
}

The final process of the rasterization stage is kind of like image processing, its main difference with the image processing is that the rasterization stage process vertices gain in geomotry stage, which means that the pixels are created and converted manually by the real vertices, while the image processing is to process an image from an pure pixel container: image itself. But there is no doubt that many conductions of image processing can be integrated from rasterization stage.


© Alexander Ezharjan

31st, March, 2022